 Recently I made the decision to temporarily move away from VMware VSAN. Whilst there was a lot of things about VSAN that I liked (close integration with the vSphere platform for example), my home lab exists to enable me to evaluate a number of different solutions.
My lab consists of three hosts with no shared storage. At this point, my options consisted of purchasing some fibre HBAs, a switch and a SAN of some sort, or sticking with Software Defined Storage. But if not VSAN, then what?
Other posts in this series:
- EMC ScaleIO
- PernixData FVP 3.5
- PernixData Architect 1.1 (coming soon)
EMC ScaleIO
ScaleIO was founded in 2011, and later bought by EMC in 2013. To quote Wikipedia:
“EMC ScaleIO converges the storage and compute resources of commodity hardware into a single-layer architecture, aggregating capacity and performance and scaling to thousands of nodes. It combines HDDs, SSDs, and PCIe flash cards to create a virtual pool of block storage with varying performance tiers. It features on-demand performance and storage scalability, as well as enterprise-grade data protection, multi-tenant capabilities, and add-on enterprise features such as QoS, thin provisioning and snapshots. ScaleIO operates on multiple hardware platforms and supports physical and/or virtual application servers”
It consists of a number of components. The first is a block storage server (SDS) which sits on each host and serves storage to clients. The second is the client itself, which can also sit on the same server, although this is not a requirement. The third is a meta-data manager, which monitors the health of the system.
It has self-healing and auto-balancing capabilities to ensure your data is well looked after.
The lab
Each host has a Samsung PM863 and two SM863 SSDs – the former previously used for caching, and the latter for capacity:

ScaleIO has the ability to make use of devices of different size and manufacturer, so mixing the 480GB and 960GB isn’t an issue.
To install ScaleIO on ESXi you will need the following:
- A Windows host (for PowerCLI)
- PowerCLI
- Java 1.8
- The ScaleIO software (obviously)
- Three vSwitch port groups
For the latter I will be using VLAN10, ScaleIO_data1 & ScaleIO_data2.
Please note: if you only use distributed vSwitches, and there are no standard vSwitches defined on your hosts, then the plugin deployment script (shown next) will fail. This is because the template which we will deploy needs a standard vSwitch to attach to.
To work around this, create a standard vSwitch without any uplinks or port groups on your hosts.
Deploy the plugin
Unzip the EMC-ScaleIO-vSphere-plugin-installer-2.0-xxx.x.zip file. Using PowerCLI, run the ScaleIOPluginSetup-2.0-xxx.x.ps1 script:

Enter the vCenter address, username and password:

Choose 1:

Type Y:

As this was my first ScaleIO installation, I chose S (standard):

Enter the IP address of the workstation you are running the script from:

If you have a browser window open which is accessing the vCenter Web Client, close it first. Open it it again, and the plugin should be registered:

At the PowerCLI prompt, press Enter:

Choose 3:

Type the name of your vCenter datacentre:
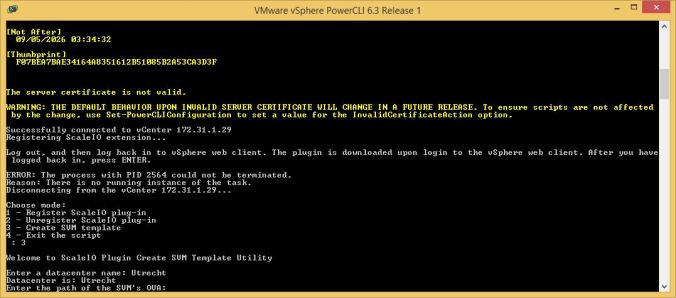
Type the path to the ScaleIOVM_2nics_x.x.xxxx.x.ova OVA file:
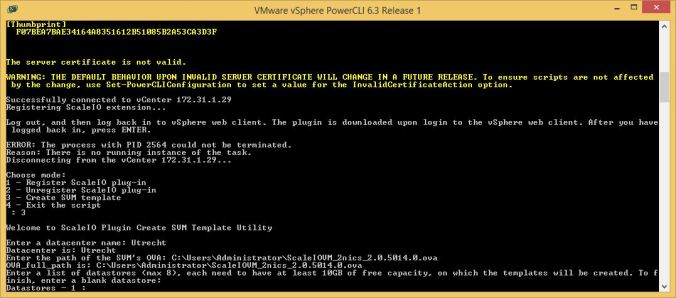
Type the name of a local datastore on each ESXi host. In the following example, I have created DS1 on ESXi1, DS2 on ESXi2 etc:

Type 4 to exit the script.
In my example, I have three hosts each with a local datastore (which consists of the remaining free space on the ESXi boot volume). As a template was deployed to each, I now have three in my inventory:

However for each template, the network is configured for the vSS port group I created earlier:
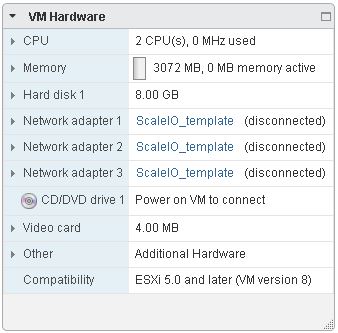
This needs to be changed.
In the vSphere Web Client, right-click each template and select Convert to Virtual Machine…

Expand the cluster and select the host you would like the converted template to reside on, then click Next

Click Finish.
Repeat the above steps for each template. When each template has been converted to a virtual machine, edit the settings of each one and change the networks to the appropriate port groups:

Finally, right-click each VM and select Template / Convert to Template…
Configure a ScaleIO cluster
In the vCenter Web Client, click ScaleIO on the home screen:

Click Install SDC on ESX:

Select the hosts you wish to install the SDC onto. For each one, type the root passwords in the boxes provided, followed by Install:

Click Finish. Finally, reboot each host.
Configuring ScaleIO
Once the hosts have been rebooted, log back into the vCenter Web Client and click ScaleIO. Click Deploy ScaleIO environment:

Click Next

Click to check the box I agree to licence terms and conditions, then click Next

Give the system a name, and type and password for the admin account. Click Next

From the drop-down box, select your vCenter:

Select the hosts you wish to configure and click Next

Select which system should host a meta-data manager or tie-breaker. As my cluster only has three nodes, I didn’t bother with the standby systems:

Click Next

Select MDM, SDS and SDC, then click Next
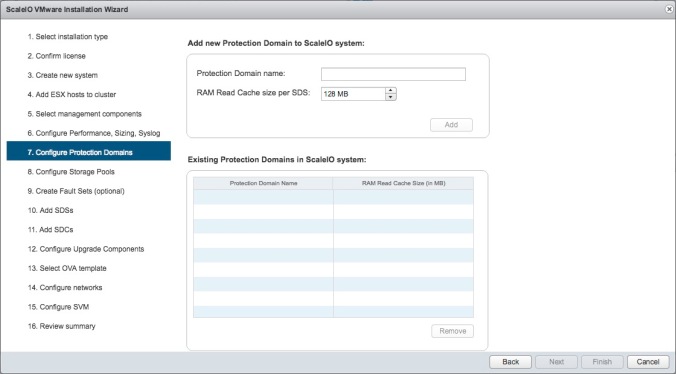
Give the Protection Domain a name and then click Add, followed by Next

In the following example, I have created two storage pools, Gold and Silver.
Type a name for the Storage Pool and click Add, followed by Next

Click Next
A ScaleIO Data Server (SDS) resides on each hosts that contributes storage. In this case, an SDS will exist on each ESXi host.

Select all hosts and click Next

Select the disks you would like to use and click Next
The ScaleIO Data Client (SDC) sits on each host that needs to access data served by the SDS. As there are only three nodes in this example, each host utilise an SDC:

Select each host and type the root password in the box provided, followed by Next. From the drop-down box, select Disable, followed by Next

Choose a host to run the ScaleIO gateway, and type a password in the box provided, followed by Next

A ScaleIO virtual machine will be deployed from each template to each ESXi host. Each VM will run an SDS for serving storage and an MDM for managing storage. The SDC, which will consume the storage, is embedded directly into ESXi.
Type a password in the box provided. This will be the admin password for each ScaleIO virtual machine once it has been deployed.
From the drop-down box, select each template and then click Next

For each network, use the drop-down box to select the appropriate network. In the following example, I have created three port groups on my distributed vSwitch:

Click Next
Configure each IP subnet as desired. When complete, click Next

Click Finish.
ScaleIO will begin the deployment task:

Once completed, click Finish.
Configure volumes
One of the last remaining tasks is to create storage volumes inside our pools for our ESXi hosts. In the following example, I will create a 400GB volume in the gold storage pool, and a 1.6TB volume in the silver one.
Using the vSphere Web Client, select EMC ScaleIO from the home page.
In the left-hand pane, click Storage Pools. Here will see any pools you have created. Right-click a pool and select Create Volume:

Give the volume a name, configure the size and select the SDCs (ESXi hosts) you’d like the volume to be consumed by:

Click OK

Click Close
In my example, the end result looks like:

In the vSphere Web Client, select an ESXi host in your cluster and click the Related Objects tab. Click Datastores, followed by the Create New Datastore icon…

Click Next

Here you will see the volumes you created previously. Continue you through the wizard to name and format them as needed.
Install the GUI
Double-click the EMC-ScaleIO-gui-2.0-xxxx.x.msi file to begin setup:

Click Next

Click to check the box I accept the terms in the License Agreement and click Next

Choose a location and click Next
Click Install

Click Finish.
Once installed, open the EMC ScaleIO GUI:

Enter the IP of the primary MDM, a username of admin and the password you specified during installation, then click Connect.

Click Confirm to accept the default certificate. Once authenticated you will see the ScaleIO GUI:

Final thoughts
I’ve only played with ScaleIO for a short time, but its advantages are immediately recognisable. With support for heterogeneous platforms, and its ability to scale up to a thousand nodes it is certainly impressive.
As it’s also block storage (albeit distributed), it opens up the possibility of using best-of-breed acceleration solutions such as PernixData’s FVP, which is not available to those looking to accelerate object-based storage such as VMware Virtual SAN.
And lets not forget its potentially biggest advantage over its rivals… it’s free.
Are there any drawbacks? Well maybe some, but none too big that spring to mind in such a short evaluation.
It could be argued that for a three-node cluster, it takes a lot of components to get the solution up and running. An SDC, SDS, MDM… and that’s all per host. Plus a gateway. That’s a lot of components that need to be provisioned, that VSAN takes care of by itself. It’s worth adding that only one ScaleIO virtual machine is deployed to each host, running the necessary components.
It also requires a Windows host running PowerCLI, which may be seen by some non-Windows shops as just another headache.
Coming up
Now that the storage tier has been provision, the next step is to accelerate it.
In the next part of this series, I will install and configure PernixData’s FVP to do just that.

Awesome post!
I’m curious, why did you choose the Samsung PM863 over the SM863 for caching when the SM863 read/write specs are much better?
I can’t wait to read your next article on PernixData as I don’t know too much about this yet.
LikeLike
http://www.anandtech.com/show/9455/samsung-releases-pm863-sm863-enterprise-sata-ssds-up-to-384tb-with-3d-vnand
There wasn’t much in it, performance wise, but there was a price difference at my vendor of choice. And I was fast heading for divorce if I’da spent much more money on the lab… 😦
-Mark
LikeLike
Hehe, gotta consider the WAF when purchasing gear I guess!
The reason I asked about the drives was because the 120GB SM863 has a 460MB/s write speed but the 120GB PM863 has a 125MB/s write speed.
Theres only an £8 difference in price on Scans website so is it a no brainer getting the 120GB SM863 over the PM863? And isn’t having the higher write speed better for a cache drive?
https://www.scan.co.uk/products/120gb-samsung-pm863-25-ssd-sata-iii-6gb-s-ahci-3-bit-mlc-v-nand-380mb-s-read-125mb-s-write-86k-5k-io
https://www.scan.co.uk/products/120gb-samsung-sm863-25-ssd-sata-iii-6gb-s-ahci-2-bit-mlc-v-nand-500mb-s-read-460mb-s-write-97k-12k-i
LikeLike
I ordered the SM863s from Scan, but the PM863s were much cheaper on Amazon 🙂
-Mark
LikeLike
So is it better to just go for the PM863 considering the small difference in price but you get a much higher write speed? Or is there a reason to consider the SM863?
LikeLike
The problem is that at around the 120GB mark the PM863 read/write speed is really bad. So for my caching tier, I wanted better speeds, so even though I wouldn’t necessarily use it I got a 480GB PM863. I could of bought an SM863, but it was more costly.
The only thing I’d advise against is the 120GB PM863. 125MB/sec write is naff.
-Mark
LikeLike
Got it! Sorry I had a typo in my post and got them mixed up, I should have said:
So is it better to just go for the SM863 considering the small difference in price but you get a much higher write speed? Or is there a reason to consider the PM863?
(these drive names are confusing since their names are so close)
Now that you have written about ScaleIO I am going to consider this an option too instead of just VSAN. I really like VSAN but the HCL and disk requirements are annoying for home use. It has made me realise that I need to get enterprise disks moving forward. So far SAS is out of the question as the pricing for SAS SSD drives are insane. Enterprise SATA SSD drives are quite reasonable I think.
Does ScaleIO do dedupe? This is one feature I love in VSAN!!
LikeLike
I ordered my first Samsung SM863 SSD drive today from Scan so it’ll be interesting to see what the results are after I test later this week!!
LikeLike
Keep me posted!
LikeLike
Watch this space!
LikeLike
Just done my first test with the Samsung SM863 SATA SSD 480GB drive connected to a SAS port on the LSI-2308. Holy wow Batman!! I setup the drive as its own datastore connected to the LSI-2308 and I migrated a 40GB to it in 98 seconds!! Or: about 418MB/s write speeds!! The write copy on the consumber SSD drives takes at least 20min.
I also did a quick VSAN test. I deleted the above datastore and when I enabled VSAN I setup the new disk in the capacity tier (on its own) and used the Samsung 850 Pro PCIe NVMe SSD 256GB drive as the cache tier. Results weren’t great for such a fast (although consumer drive). I was getting write speeds of about 200MB/s.
Next test will be with the Samsung SM863 drive connected to one of the onboard Intel SATA ports (non SAS)…
LikeLike
Connecting the Samsung SM863 to the Intel SATA (non SAS) port on the motherboard yields good results too!! Transferred a VM to the SM863 in 113s (40GB file) and then transferred the same file from the SM863 to the NVMe drive in 95 seconds. Speeds? Between 380MB/s and 420MB/s. I’m a happy bunny!
So moral of the story: Don’t use consumer driver in an ESXi host!
I’ll be ordering a second SM863 and then setting up a VSAN datastore both these drives (capacity and cache) to see what sort of speeds I’ll get with Enterprise drives only. If I throw the consumer Samsung NVMe drive into the VSAN datastore as the cache it doesn’t seem to do too well…
I feel like I have a new server!
LikeLike
Fantastic! Glad to hear you’re finally getting some decent results.
I’m going to put a post together soon about getting hdibench up and running… that’ll be the true measure 😉
-Mark
LikeLike
I have learnt so much doing all this. Mostly/ avoid consumer gear in a homelab (if you can help it). Funny thing is the enterprise SSDs aren’t THAT much more expensive than the consumer stuff.
I’ve got my eyeball on the Intel P3700 for the cache tier…ouch.
Look forward to your article on hdibench!
Your help has been amazing, thanks so much!
LikeLike
Not at all! Let me know if you get the P3700 🙂
-Mark
LikeLike
Sure! I’m trying to find out if the Intel P3700 fits in the Supermicro Mini Tower Intel Xeon D-1541? This server takes one low profile card but the Intel card is sold as a “HHHL” card so I’m not sure if it’ll fit? Even emailing Supermicro didn’t help!
LikeLike
So far I have been really pleased with the testing I have done with the Samsung SM863 480GB SSD (I have a second one on order!). Its quick! I think I *may* have to skip using the P3700 for the cache tier as I want to use the one and only PCIe slot in the Supermicro server for a video card I can use with XenDesktop.
I noticed on the VSAN HCL that the Samsung SM863 480GB SSD is only listed as supported if used in the capacity tier of an all flash VSAN. I looked at the Intel DC S3700 for the cache tier but the write speeds aren’t great (365MB/s) and its super expensive.
Do you think using a Samsung SM863 480GB SSD in the cache tier would work ok? It has a write speed of 485MB/s and I was thinking I could over provision it to 200GB (my capacity tier won’t be more than 2TB…ever). Also, the endurance of the SM863 drive is 3080 TBW so it won’t wear out anytime soon (the Intel is rated at 3650 TBW).
LikeLike
Yes I think that’d work very well.
I use a PM863 480GB in my hosts and they perform nicely.
-Mark
LikeLike
Thanks Mark! Hows the ScaleIO setup going compared to VSAN?
LikeLike
Not really much done with it. Various other lab projects have taken up my time :-(\
-Mark
LikeLike
I can’t wait to have the same problem when I get my lab 😉
LikeLike
So I was thinking today (after reading some more VSAN documentation). You can have two disk groups in one server where each disk group has its own cache drive…yes?
This must do wonders for your write speeds on that node? I was thinking, rather have two disk groups using SM863 drives for cache/capacity rather than a single disk group with SM863 drives in capacity and the Intel P3700 for cache tier? What do you think?
VSAN appears so simple but the options are endless!
LikeLike
My second SM863 drive arrived today so I have setup a two disk single server VSAN datastore with one SM863 as cache and the other as capacity. Initial results were disappointing. Copying a 5GB file into a VM on the VSAN datastore got me about 158MB/s
Then I remember reading somewhere about poor performance in VSAN if you had checksumming enabled (which is the default). So I disabled the checksum option and the write speeds went from 158MB/s to 317MB/s! Not too shabby but still not quite the 485MB/s that the drive is capable of. I have connected the drives to the onboard Intel SATA ports so maybe this is partly to blame.
Next test…using the onboard LSI-2308 controller with the SM863 drives!
I didn’t think having checksum enabled would reduce write performance that much? I’ve read that even with a P3700 you may only get about 250MB/s with it turned on…ouch.
LikeLike
Check out Cormac’s page on it: http://cormachogan.com/2016/02/17/vsan-6-2-part-3-software-checksum/
-Mark
LikeLike
Thanks Mark.
I’ve thrown in the towel with VSAN (for now). I just don’t have enough kit/memory/etc to use VSAN yet. Enabling VSAN on a 32GB of memory server didn’t work well and I’m still finding the performance disappointing.
After disabling VSAN I setup my new SM863 drives as two datastores and have also started using my PCIe SSD as its own datastore and the performance I am getting now is really good. Copies between VMs are between 200-300MB/s. Interestingly when doing a storage vMotion I am getting about 450MB/s speeds which is amazing but I’m not sure why VM to VM copies are much slower? I am using the VMXNET3 vNIC.
Sure has taught me loads about storage in ESXi thought!
LikeLike
Pingback: New Home Lab Hardware - Dual Socket Xeon v4 - frankdenneman.nl
Pingback: Installing and configuring EMC ScaleIO 2.0 and PernixData FVP – Part 2: FVP 3.5 | virtualhobbit
Pingback: Recovering data from damaged VMFS partitions | virtualhobbit