 In part 3 of this series I configured nginx+ to support Microsoft Exchange.
In this part, I configure Microsoft Exchange 2010/13.
Other articles in the series:
- Installing and configuring keepalived
- Installing nginx+
- Configuring nginx+ for Microsoft Exchange
- Configuring Microsoft Exchange
- Tidying up
The Exchange environment consists of the following:
- 3 sites (2 in Amsterdam, 1 in London, 1 DR (Southport, UK))
- 2 Windows 2008 R2 domain controllers (core) (1 in Amsterdam, 1 in London)
- 11 Exchange 2010 SP3 RU9 servers
- 3 client access servers (2 in Amsterdam, 1 in London)
- 3 hub transport servers (2 in Amsterdam, 1 in London)
- 5 mailbox servers (3 in Amsterdam, 2 in London)
- 2 Forefront Threat Management Gateway 2010 servers (1 in Amsterdam, 1 in London)
- 1 Windows 2008 R2 landing pad (for administration)
Background information
The Exchange solution I have designed is based on the concept of a production and resource domain. All user accounts are hosted in the production domains (nl.mdb-lab.com and uk.mdb-lab.com), and all Exchange-related objects reside in the resource domain (mail.mdb-lab.com). A trust exists between the two forests, and accounts are linked to mailboxes.
Whilst there are many advantages to this design, it does add extra complexity and there are simpler ways to bring Exchange to the organisation.
The first disadvantage is in the choice of name I made for the resource domain. Ideally I wanted to use a consistent name across the estate for all services – mail.mdb-lab.com. Unfortunately with DNS stub domain created to support the forest trust won’t allow this – any request for mail.mdb-lab.com will also return the IP addresses of the two domain controllers in the resource domain. The only way around this it to configure internal hosts to use outlook.mail.mdb-lab.com and use mail.mdb-lab.com for external clients. In hindsight I wish I had of named the domain exchange2010.mdb-lab.com.
At first the aim is to load-balance Exchange front-end traffic for users in Amsterdam for both Outlook Web App and the Outlook client. Exchange ActiveSync will also benefit from this additional layer of redundancy, along with using TMG to publish this to external users.
First, create an A record in DNS to point to the load-balanced address:
dnscmd dc1.mail.mdb-lab.com /RecordAdd mail.mdb-lab.com outlook A 172.17.80.13
For inbound SMTP from the internet, mail will come from the Exchange 2010 Edge server in the DMZ. However if you want to take advantage of the load-balanced address for sending email internally then another DNS entry is preferred:
dnscmd dc1.mail.mdb-lab.com /RecordAdd mail.mdb-lab.com smtp A 172.17.80.13
Using the Exchange Management Shell, create a new client access array on your Exchange server:
New-ClientAccessArray -Name "outlook.mail.mdb-lab.com" -fqdn "outlook.mail.mdb-lab.com" -site Amsterdam
Configure the RpcClientAccessServer attribute on the mailbox database:
Set-MailboxDatabase DB1 -RpcClientAccessServer "outlook.mail.mdb-lab.com"
You can check this by using:
Get-MailboxDatabase | select name,rpcclientaccessserver | ft -auto
If done correctly that should show:

When the Outlook client communicates with the Client Access Servers it does so by first connecting the TCP Endpoint Mapper on tcp/135. After that, it chooses a port from the dynamic RPC port range (6005-59530). For load balancing to work, we need to restrict this to as few ports as possible.
We do this by setting the ports in the registry for the Exchange RPC and Address Book services.
Create the following registry keys on each CAS in the site using:
reg add HKLM\SYSTEM\CurrentControlSet\services\MSExchangeAB\Parameters /v RpcTcpPort /t REG_SZ /d 60001
reg add HKLM\SYSTEM\CurrentControlSet\services\MSExchangeRPC\ParametersSystem /v "TCP/IP Port" /t REG_DWORD /d 60000
Reboot each CAS and verify the ports are in place using Netstat:
netstat -an -p tcp | find "60000"
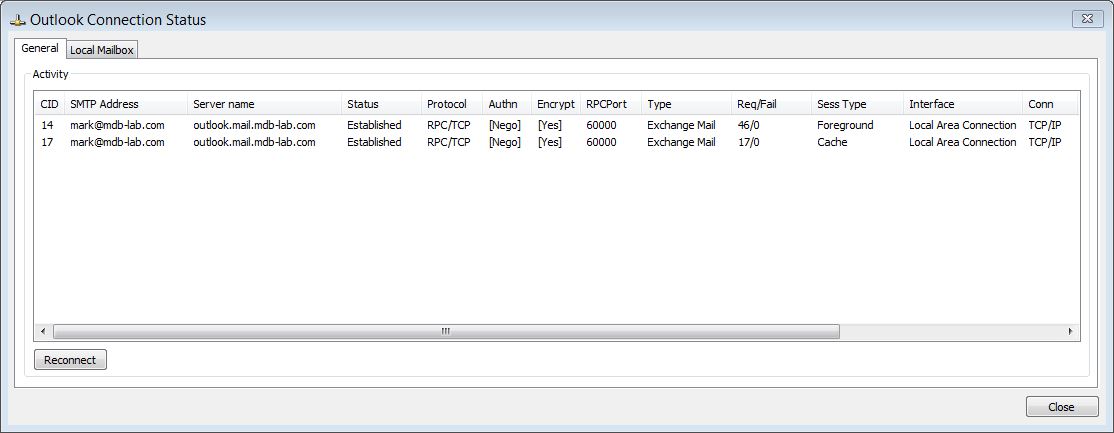
Finally, configure Outlook and connect to Exchange. The connection status should box should show a connection to the RPC port configured previously:
That’s it for the Exchange configuration. In part 5 I tidy up a few things before the solution can be put live.
