 Whilst on the road the other day a client contacted me saying they needed help creating some SSL certificates for a wi-fi/RADIUS proof of concept. They had all the hardware and configuration sorted, but to use EAP-TLS they effectively needed my help to spin up a Certificate Authority.
Oh, and they need it in an hour.
Unfortunately, I was on Eurostar between Brussels and London, and whilst the 3/4G access is good (even better in the tunnel), maintaining a remote connection to the lab is difficult.
I didn’t have a Linux distribution ISO with me, and even if I did, I didn’t have the bandwidth to upload a VM (Fusion or VirtualBox) that I’d pre-configured.
This would be an ideal job for a container.
Seeing as I had my Mac with me, and after VMware’s announcement of AppCatalyst and Project Bonneville at DockerCon 2015, I thought this would be a good opportunity to see what’s possible.
Here we go
Download VMware AppCatalyst. Mount the .dmg file and install the package.
Modify your path to point to the AppCatalyst binary folder:
export PATH=/opt/vmware/appcatalyst/bin:$PATH
Create the VM:
appcatalyst vm create dockertest
Power on:
appcatalyst vmpower on dockertest
Wait a minute, and then get the guest IP:
appcatalyst guest getip dockertest
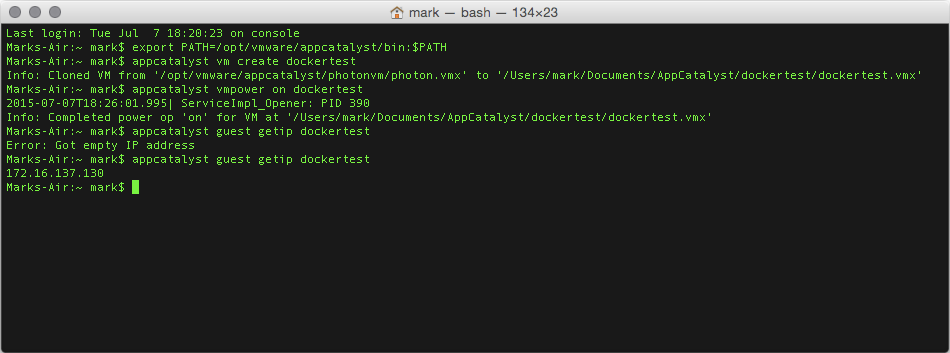
In this case the IP is 172.16.137.130:
SSH to the guest using the in-built SSH key:
ssh -i /opt/vmware/appcatalyst/etc/appcatalyst_insecure_ssh_key photon@172.16.137.130
Type yes to continue connecting.
Photon
We are now inside VMware’s lightweight Linux distribution called Photon. Whilst small and lightweight, it doesn’t have what we need to run a full OpenSSL Certificate Authority. What we need is to create a container and run our app in that. Then we can send this container to the client.
Use Docker to pull down the Centos image. As one doesn’t exist locally it will be pulled down from the Docker Hub:
sudo docker run -d -it centos
This will come back with a long string of characters, the first twelve being the container ID. You can get this again by listing the Docker containers currently running:
sudo docker ps
In this case our container ID is 2cf9c6553347:

Attach to the container (press return twice):
sudo docker attach 2cf9c6553347
Inside Docker
Once inside the container install OpenSSL and wget:
cd /root
yum install -y --nogpgcheck openssl wget
Now that OpenSSL is installed, we need to create the Certificate Authority. For this we need three configuration files (CA, server and client) and the xpextensions file so the certificates can be used by Microsoft clients to authenticate.
Download the plain-text configuration files:
for i in ca.cnf server.cnf client.cnf xpextensions; do wget https://github.com/virtualhobbit/blog/blob/5f8b5bbd26054591ce5066ef04d6e690587c24a8/$i; done
Each file contains a section like:
countryName            = NL
stateOrProvinceName    = Amsterdam
localityName           = Amsterdam
organizationName       = virtualhobbit
emailAddress           = virtualhobbit@virtualhobbit.local
commonName             = "virtualhobbit Root CA"
Substitute the values to suit your environment accordingly. Do not modify the emailAddress and commonName in client.cnf, this will be done later.
Use vi to create a script called ca_build.sh:
#!/bin/sh

if [ ! -f dh ]; then
  openssl dhparam -out dh 1024 || exit 1
  if [ -e /dev/urandom ] ; then
        dd if=/dev/urandom of=./random count=10 >/dev/null 2>&1;
  else
        date > ./random;
  fi
fi

if [ ! -f server.key ]; then
  openssl req -new  -out server.csr -keyout server.key -config ./server.cnf || exit 1
fi

if [ ! -f ca.key ]; then
  openssl req -new -x509 -keyout ca.key -out ca.pem -days `grep default_days ca.cnf | sed 's/.*=//;s/^ *//'` -config ./ca.cnf || exit 1
fi

if [ ! -f index.txt ]; then
  touch index.txt
fi

if [ ! -f serial ]; then
  echo '01' > serial
fi

if [ ! -f server.crt ]; then
  openssl ca -batch -keyfile ca.key -cert ca.pem -in server.csr  -key `grep output_password ca.cnf | sed 's/.*=//;s/^ *//'` -out server.crt -extensions xpserver_ext -extfile xpextensions -config ./server.cnf || exit 1
fi

if [ ! -f server.p12 ]; then
  openssl pkcs12 -export -in server.crt -inkey server.key -out server.p12  -passin pass:`grep output_password server.cnf | sed 's/.*=//;s/^ *//'` -passout pass:`grep output_password server.cnf | sed 's/.*=//;s/^ *//'` || exit 1
fi

if [ ! -f server.pem ]; then
  openssl pkcs12 -in server.p12 -out server.pem -passin pass:`grep output_password server.cnf | sed 's/.*=//;s/^ *//'` -passout pass:`grep output_password server.cnf | sed 's/.*=//;s/^ *//'` || exit 1
  openssl verify -CAfile ca.pem server.pem || exit 1
fi

if [ ! -f ca.der ]; then
  openssl x509 -inform PEM -outform DER -in ca.pem -out ca.der || exit 1
fi
Make the script executable and run it:
chmod +x ca_build.sh
./ca_build.sh
Creating the certificates
We now have a functional certificate authority. Lets create some user certificates.
Create a CSV file for your users with their username and email address as values. For demonstration I have created a file called called users.csv with three entries:
CaptainAmerica,captainamerica@virtualhobbit.local
Thor,thor@virtualhobbit.local
Ironman,ironman@virtualhobbit.local
Use vi to create a script called gen_certs.sh:
#!/bin/sh

while IFS=, read name email
do

   sed -e "s/emailAddress =$/emailAddress = ${email}/" client.cnf > client_tmp.cnf

   sed -e “s/commonName =$/commonName = ${name}/“ client_tmp.cnf > $name.cnf

   openssl req -new -out $name.csr -keyout $name.key -config ./$name.cnf

   openssl ca -batch -keyfile ca.key -cert ca.pem -in $name.csr -key `grep output_password ca.cnf | sed 's/.*=//;s/^ *//'` -out $name.crt -extensions xpclient_ext -extfile xpextensions -config ./$name.cnf

   openssl pkcs12 -export -out $name.p12 -inkey $name.key -in $name.crt -certfile ca.der -passin pass:`grep output_password ca.cnf | sed 's/.*=//;s/^ *//'` -passout pass:VMware1!

   rm -f client_tmp.cnf $name.cnf $name.csr $name.key $name.crt

done < users.csv
Run the script:
chmod +x gen_certs.sh
./gen_certs.sh
This will output three certificates all ending in .p12. These contain the private key and the users’ certificate.
The import password is VMware1!.
Sharing
We now have a working CA that generates user certificates. Now all that is left to do is get this over to the customer.
In another terminal window, SSH into Photon and save your container:
sudo docker commit 2cf9c6553347 ca
Verify the image is there:
sudo docker images
Login to docker:
sudo docker login
I have created a private repository and added the client as a contributer. To push to that repository use (substitute accordingly):
sudo docker push virtualhobbit/ca
All the client has to do now is fire-up Photon, login to Docker and run:
sudo docker pull virtualhobbit/ca
Once inside the container the client only has to supply their own users.csv file and then run gen_certs.sh!

Pingback: Wednesday Tidbit: Administering your Microsoft Azure account in Docker | virtualhobbit