 When it first came out last year, I installed Microsoft SQL 2014 and configured an Availability Group to host my vCenter database (despite it not being supported).
Unfortunately it has never worked perfectly, and today I decided it was time to do the job right. I still need high availability for my SQL Server, and Microsoft Clustering Services would be ideal.
Microsoft clustering on VMware has been available for about for ten years, but it’s been a while since I setup a cluster using MSCS on vSphere and I welcomed the opportunity to refresh my memory on how to do it.
As the lab is still running on vSphere 5.5 and my SQL servers are multi-processor VMs, using FT to provide continuous uptime isn’t an option.
Windows
In an effort to maximise performance, lower administration and reduce the OS footprint, I will be using Windows Server 2012 R2 Server Core. Microsoft SQL Server 2014 supports both Windows Server 2012 R2 and Server Core installations.
I’m a big fan of Server Core. There’s less OS, which means less to break, less to patch, less to hack. However it does require more command-line knowledge, a skill Windows sysadmins tend to shy away from – so I guess less people around to fix it if it does break.
Create a PowerCLI script called build_1stNode.ps1 (substitute names accordingly):
# Variables

$vc = "vc.uk.mdb-lab.com"
$credential = Get-Credential
$cluster = "London Cluster"
$vmName = "cluster1.uk.mdb-lab.com"
$numCPU = "2"
$numMem = "4096"
$numDisk = "51200"
$ds = "Tier 1"
$vmdkFormat = "Thick";
$net = "VLAN60"
$netCluster = "cluster_net"
$guestOS = "windows8Server64Guest"
$ver = "v10"
$iso = "en_windows_server_2012_r2_with_update_x64_dvd_4065220.iso"
$cdpath = "[$ds] $iso"

# Connect to vCenter
Connect-VIServer $vc -credential $credential

$myCluster = Get-Cluster -Name $cluster

# Create first node
New-VM -name $vmName -ResourcePool $myCluster -numcpu $numCPU -memoryMB $numMem -DiskMB $numDisk -datastore $ds -DiskStorageFormat $vmdkFormat -Network $net -guestID $guestOS -cd -Version $ver

# Set network adapter to VMXNET3
Get-NetworkAdapter -VM $vmName | Set-NetworkAdapter -Type vmxnet3 -Confirm:$false

# Add second network adapter for cluster communication
New-NetworkAdapter -VM $vmName -NetworkName $netCluster -Type vmxnet3 -StartConnected -Confirm:$false

# Add CD drive with ISO
Get-CDDrive -VM $vmName | Set-CDDrive -IsoPath $cdpath -StartConnected $true -Confirm:$false

Disconnect-VIServer $vc -confirm:$false
This creates a VM with the following virtual hardware:
- 2 vCPU
- 4GB RAM
- 50GB hard disk
- 2 x VMXNET3 network adapter
Open PowerCLI and set the execution policy:
Set-ExecutionPolicy Unrestricted

Press Y and then enter.
Execute the script
.\build_1stNode.ps1
Once the VM has been created power it on:
Start-VM -VM $vmName -Confirm:false
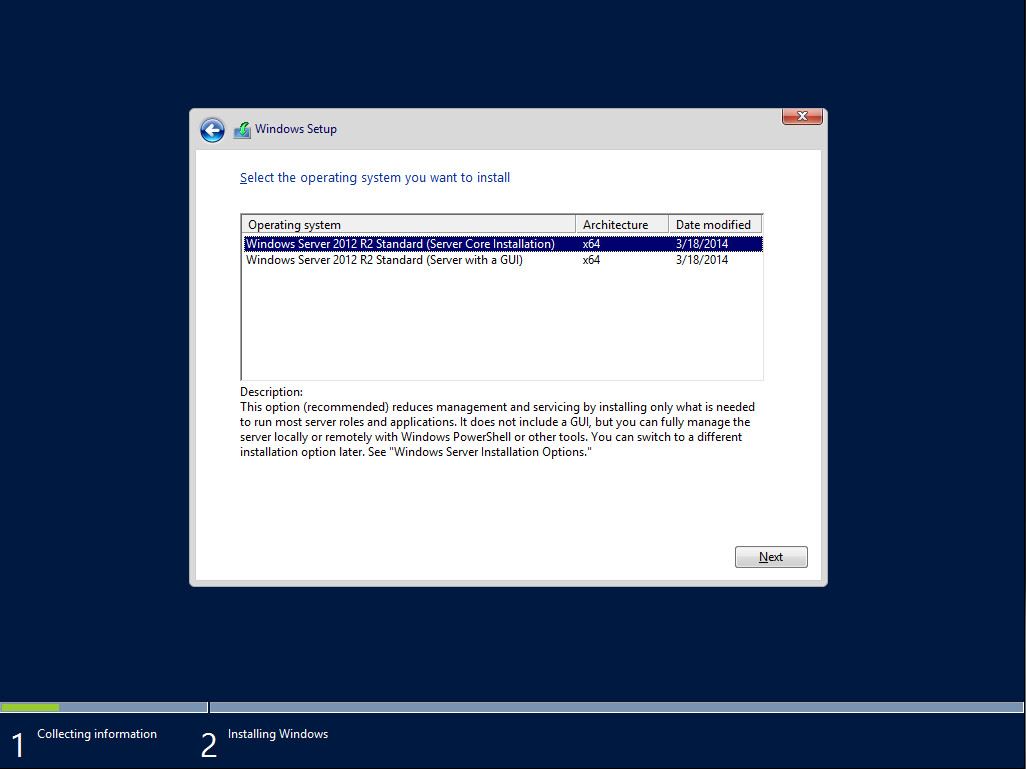
Install Windows Server 2012 R2 onto the VM. Install a product key, and when asked to select an Operating System, choose Server Core:
Accept the licence terms and select the drive you wish to install Windows on.
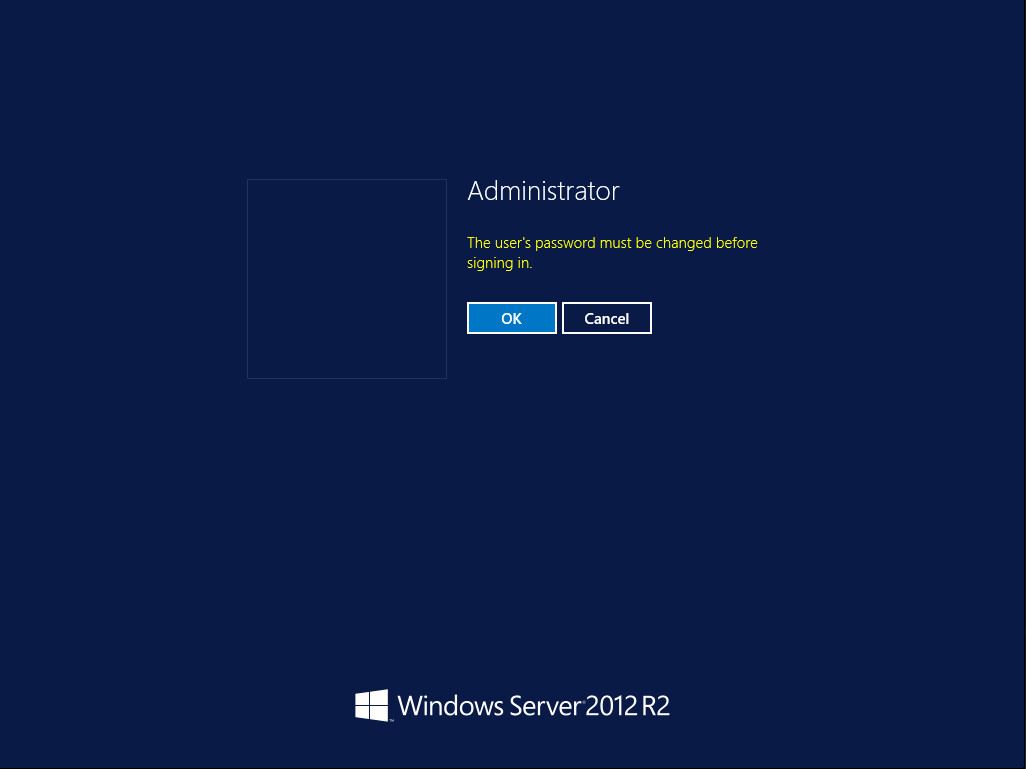
After the first boot, assign a password:
Once at the command line, install VMware Tools. On the VM’s VM menu, click Guest / Install/Upgrade VMware Tools. In the VM, change to the CD drive and use:
setup64.exe /s /v "/qn REBOOT=R"
After the reboot, set the FQDN:
reg add HKLM\SYSTEM\CurrentControlSet\Services\Tcpip\Parameters /v Domain /t REG_SZ /d uk.mdb-lab.com
reg add HKLM\SYSTEM\CurrentControlSet\Services\Tcpip\Parameters /v SearchList /t REG_SZ /d uk.mdb-lab.com
Rename the computer:
netdom renamecomputer %ComputerName% /NewName:cluster1 /REB
List the network interfaces:
netsh interface ipv4 show interfaces
Which should give something like:
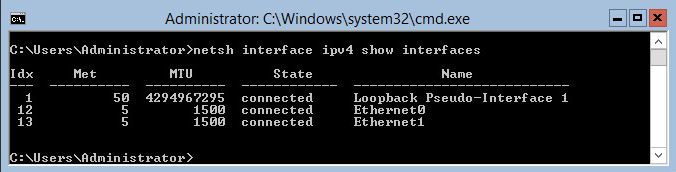
We will use Ethernet0 as the public network connection, and Ethernet1 as the private (cluster-only communication) network connection.
Select the LAN interface number (Idx – in this case 12) for Ethernet0 and use this to set the public IP address (substitute accordingly):
netsh interface ipv4 set address name="12" source=static address=192.168.146.101 mask=255.255.255.0 gateway=192.168.146.253
Select the LAN interface number for Ethernet1 and use this to set the private IP address:
netsh interface ipv4 set address name="13" source=static address=192.168.0.1 mask=255.255.255.252
Set the DNS server address:
netsh interface ipv4 add dnsserver name="12" 192.168.146.1 index=1
Set the power management to High Performance. First, list the power schemes:
powercfg /L
Set the power scheme High Performance to active:
powercfg -setacive 8c5e7fda-e8bf-4a96-9a85-a6e23a8c635c
List the power schemes again, this time verifying High Performance has a mark against it to show it is active:
powercfg /L
Optional – if the VM has internet access, activate Windows:
slmgr /ato
Turn off the Windows firewall:
netsh advfirewall set allprofiles state off
Finally, add the first node to the domain:
netdom join %ComputerName% /domain:uk.mdb-lab.com /userd:Administrator /passwordd:*
shutdown /s /t 0
Create the template
Create a PowerCLI script called clone_1stNode.ps1:
# Variables

$vmName = "cluster1.uk.mdb-lab.com"
$myVM = Get-VM -Name $vmName
$template = "clusterTemplate"
$ds = "Tier 1"
$dc = "London"

# Make sure first node is powered off
if ($myVM.Powerstate -ne "PoweredOff") {Shutdown-VMGuest -VM $vmName -Confirm:$false}

# Create template from first node
New-Template -VM $myVM -Name $template -Datastore $ds -Location $dc
Execute the script:
.\clone_1stNode.ps1
Now deploy the second cluster node from the template. To do this create a PowerCLI script called deploy_2ndNode.ps1:
# Variables

$2ndvmName = "cluster2.uk.mdb-lab.com"
$template = "clusterTemplate"
$myTemplate = Get-Template -Name $template
$clusterSpec = "clusterSpec"
$mySpec = Get-OSCustomizationSpec -Name $clusterSpec

# Create second node from template
New-VM -Name $2ndvmName -Template $myTemplate -ResourcePool $myCluster -OSCustomizationSpec $mySpec
For this to work, we need an OS customization specification loaded into the vCenter. I have created an example called clusterSpec which you can download. Please modify it to suit your environment, and save it as C:\clusterSpec.xml:
Import the spec into vCenter:
$view = Get-View CustomizationSpecManager
$xmlfile = "C:\clusterSpec.xml"
$xml = Get-Content ($xmlfile)
$view.CreateCustomizationSpec($view.XmlToCustomizationSpecItem($xml))
Execute the script:
.\deploy_2ndNode.ps1
Configure shared storage
We now have to add our shared storage. We will create three hard disks – one that is 2GB in size and two that are 20GB.
Ensure that both VMs are switched off. Create a PowerCLI script called add_disks.ps1:
# Variables

$vmName = "cluster1.uk.mdb-lab.com"
$myVM = Get-VM -Name $vmName
$quorumDiskSize = "2"
$sqlDiskSizes = "20"
$cont = "SCSI Controller 1"

# Power off first node
if ($myVM.Powerstate -ne "PoweredOff") {Shutdown-VMGuest -VM $vmName -Confirm:$false}

# Add the second hard disk.  This will be the quorum disk
$vmdkFormat = "EagerZeroedThick"
New-HardDisk -VM $vmName -CapacityGB $quorumDiskSize -StorageFormat $vmdkFormat | New-ScsiController -Type VirtualLsiLogicSAS -BusSharingMode Virtual

# Add the next two disks
1..2 | ForEach {New-HardDisk -VM $vmName -CapacityGB $sqlDiskSizes -StorageFormat $vmdkFormat -Controller $cont}
Execute the script:
.\add_disks.ps1
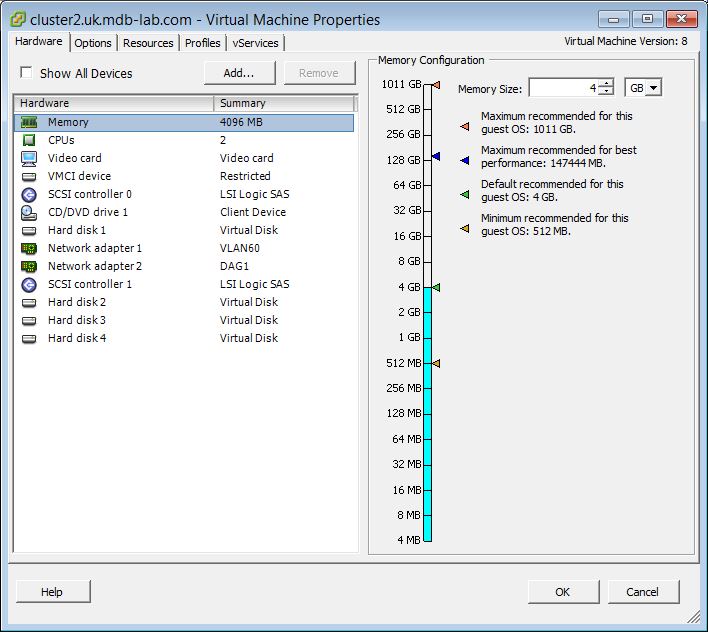
Using the vSphere Client, right-click the first node and click Properties:

Click Hard disk 2 and change the Virtual Device Node to SCSI (1:0):

Repeat the above steps for Hard disk 3 and Hard disk 4. Make them SCSI (1:1) and SCSI (1:2) respectively.
Power the first cluster node on:
Start-VM -VM $vmName -Confirm:false
Login to the first node. At the command prompt run the disk partition utility:
diskpart
List the disks:
list disk
Configure the first disk that has been added:
sel disk 1
online disk
attrib disk clear readonly
create part pri
sel part 1
format fs=NTFS label="Quorum" quick
Configure the second disk:
sel disk 2
online disk
attrib disk clear readonly
create part pri
sel part 1
format fs=NTFS label="SQL_data" quick
assign letter=F
Configure the remaining disk:
sel disk 3
online disk
attrib disk clear readonly
create part pri
sel part 1
format fs=NTFS label="SQL_logs" quick
assign letter=G
Now add the disks to the second node. Create a PowerCLI script called add_disks2.ps1:
# Variables

$2ndvmName = "cluster2.uk.mdb-lab.com"
$disk1 = $vmName + "/&"+ $vmName + "_1.vmdk"
$disk2 = $vmName + "/&" + $vmName + "_2.vmdk"
$disk3 = $vmName + "/&" + $vmName + "_3.vmdk"
$cont = "SCSI Controller 1"

# Add the first disk
New-HardDisk -VM $2ndvmName -DiskPath "[$ds] $disk1" | New-ScsiController -Type VirtualLsiLogicSAS -BusSharingMode Virtual

# Add the remaining disks
New-HardDisk -VM $2ndvmName -DiskPath "[$ds] $disk2" -Controller $cont
New-HardDisk -VM $2ndvmName -DiskPath "[$ds] $disk3" -Controller $cont
Execute the script:
.\add_disks2.ps1
Again using the vSphere Client, right-click the second node and click Properties:
Click Hard disk 2 and change the Virtual Device Node to SCSI (1:0):

Repeat the above steps for Hard disk 3 and Hard disk 4. Make them SCSI (1:1) and SCSI (1:2) respectively.
Important – the settings for the second node must exactly match those of the first. So if Hard disk 2 on the first node is SCSI (1:0) on the first node, then it needs to be SCSI (1:0) on the second.
Power the second cluster node on:
Start-VM -VM $2ndvmName -Confirm:false
Build the cluster
On the each cluster node open PowerShell:
powershell
On each node also ensure the Windows Server 2012 R2 ISO is mounted and install the necessary components:
Install-WindowsFeature -Name Net-Framework-Core -Source D:\sources\sxs
Install-WindowsFeature -Name Failover-Clustering -IncludeManagementTools
On the first node, create a new cluster:
New-Cluster -Name cluster -Node cluster1, cluster2 -StaticAddress 192.168.146.103
Add hard disks:
Get-ClusterAvailableDisk | Add-ClusterDisk
Rename the disks:
(Get-ClusterResource -Name "Cluster Disk 1").Name = "Quorum"
(Get-ClusterResource -Name "Cluster Disk 2").Name = "SQL_data"
(Get-ClusterResource -Name "Cluster Disk 3").Name = "SQL_logs"
Bring the disks online:
ForEach ($disk in "Quorum","SQL_data","SQL_logs") { Start-ClusterResource $disk$}
Set the quorum:
Set-ClusterQuorum -NodeAndDiskMajority "Quorum"
We now have to give the cluster machine account the ability to create computer accounts in the domain.
There are a number of way to do this, however the easiest (not necessarily the best) way is to modify the Default Domain Controllers Group Policy and grant cluster service account (in this case CLUSTER$) the “Add workstations to the domain” right.
Install SQL Server 2014
As there is no GUI interface to Server Core, the SQL installation will be command-line driven and will make use of two configuration files. The prep script is run on both nodes and the full one is only run on one.
Download each ini file. Copy the SQL prerequisite script to both nodes:
for $i in (1,2) do copy cluster_prep.ini \\cluster%i\c$
Copy the full SQL script to the first node:
copy cluster_full.ini \\cluster1\c$
Install SQL prerequisites on the first node (substitute passwords accordingly):
D:\setup.exe /SQLSVCPASSWORD="mySQLpassword" /AGTSVCPASSWORD="mySQLagentpassword" /ConfigurationFile=C:\cluster_prep.ini /Q /IAcceptSqlServerLicenseTerms
Repeat the above command on the second node.
Perform a full SQL installation on the first node using the following:
D:\setup.exe /SAPWD="mySQpassword" /ConfigurationFile=C:\cluster_full.ini /SkipRules=Cluster_VerifyForErrors /Q /IAcceptSqlServerLicenseTerms
Add the SQL_data and SQL_logs disks to the SQL Resource Group:
ForEach ($res in "SQL_data","SQL_logs"){Add-ClusterResource -Name $res -ResourceType "Physical Disk" -Group "SQL Server (MSSQLSERVER)
Update the SQL Server Resource Group dependency list:
Add-ClusterResourceDependency "SQL Server" "SQL_data"
Add-ClusterResourceDependency "SQL Server" "SQL_logs"
Install the latest Service Pack
At the time of writing, SQL Server 2014 Service Pack 1 is the latest service pack available. Whilst the easiest way to deploy a service pack is to slipstream it into the SQL installation media, I wanted to do this separately to demonstrate how to do it.
Download SQL Server 2014 Service Pack 1 from Microsoft. Copy it to both nodes. On each node, extract the file:
SQLServer2014SP1-KB3058865-x64-ENU.exe /extract:C:\SP1
Move the SQL Server Resource Group to the second node:
Move-ClusterGroup "SQL Server (MSSQLSERVER)" -Node CLUSTER2
Install the Service Pack on the first node:
C:\SP1\setup /ACTION="PATCH" /Q /IAcceptSqlServerLicenseTerms
Move the SQL Server Resource Group back to the first node:
Move-ClusterGroup "SQL Server (MSSQLSERVER)" -Node CLUSTER1
Install the Service Pack on the second node:
C:\SP1\setup /ACTION="PATCH" /Q /IAcceptSqlServerLicenseTerms
Finished
That’s it, all done! We now have a Microsoft SQL Server 2014 failover cluster running on Windows Server 2014.

Thanks for the Article, Kindly Clairy the below two points
1. is this a Cluster Across Box (CAB ) or Cluster in a BOX ( CIB) configuration ?
2. Also looks like you have used VMDK disk, what would happen to both the SQL nodes.if ESX host is down ?
LikeLike
Hi Manish,
This is a Cluster in a Box (CIB). So if the host goes down, so does the SQL cluster.
It’s only a Proof of Concept to show how it would be done, and not something to be used in production.
LikeLike
The company I just joined has the same problem as you mentioned in your post. We have a Vcenter application on AG . I plan to move it back to an sql cluster sometime in january. How did you do that? Can you please post about it as well Thanks!
LikeLike
I would first stop the vCenter services. I’d then backup the vCenter database on your current server and restore it to your new one. Then edit the OBDC connection on your vCenter to point to the new SQL server. Finally, start the vCenter services and you should be good to go!
Good luck!
LikeLike