 Recently I revamped my lab storage with the addition of a HP Microserver Gen8 and a dual-port Emulex OCe10102 10GbE card. After some initial struggles with Windows Server 2012 R2 and Windows Server 2016 Technical Preview 3, I decided to go back to FreeNAS 9.3.
The following is a list of handy tips I’ve compiled for using FreeNAS in a lab environment with VMware ESXi. This list is not meant to be seen as comprehensive but rather as one which I will continue to add to over time. Please feel free to add your own suggestions in the comment box below.
Jumbo Frames
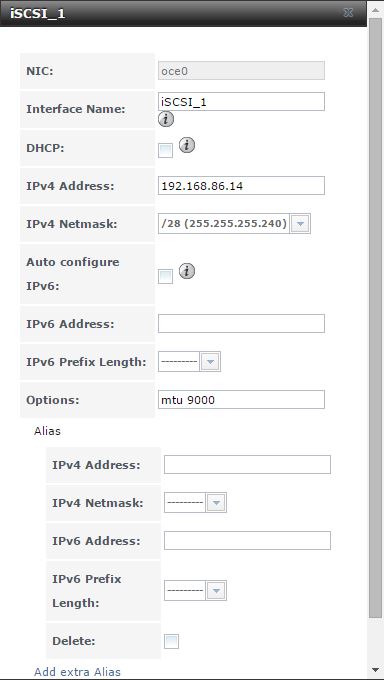
To enable jumbo frames in FreeNAS, select the interface in the GUI. In the options box, type mtu 9000:
Alternatively, use the following command in a terminal:
ifconfig oce0 mtu 1500
Where oce is the interface you want to enable jumbo frames on.
In ESXi, jumbo frames must be enabled on both the virtual switch (standard or distributed) and the vmknic.
In the following example, we have a standard virtual switch called vSwitch1 that we will configure:
esxcli network vswitch standard set -m 9000 -v vSwitch1
Confirm the change has taken effect:
esxcli network vswitch standard list | grep MTU
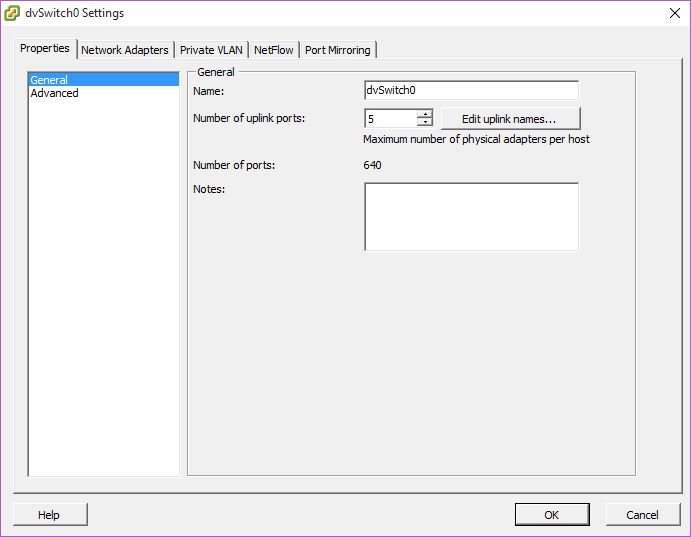
esxcli is aimed at host configuration, and as such is unable to configure distributed vswitches as they are configured at vCenter level. In the following example we configure a dvSwitch (dvswitch0) using the vSphere Client. On the Home screen in vCenter, select the Networking tab, followed by your dvSwitch. Right-click the dvSwitch and click Edit Settings…
Click the Advanced tab:
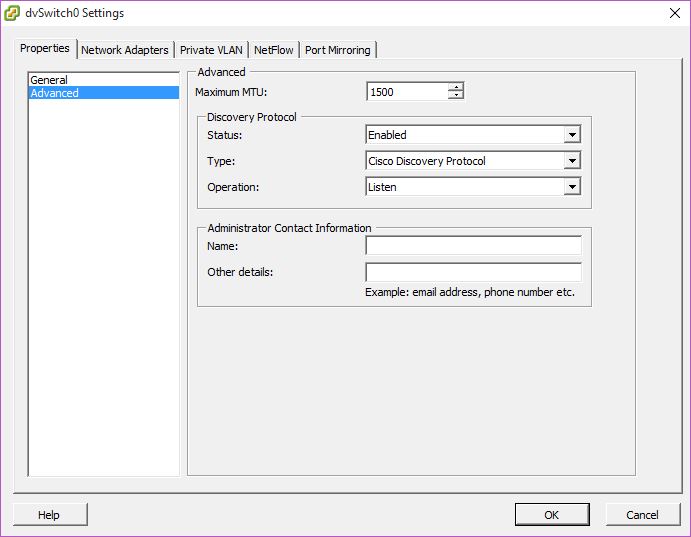
In the Maximum MTU field, type 9000:

Jumbo frames now needs to be configured on the vmknic. In the following example, we have configured vmk2 as our iSCSI interface. Use the following:
esxcli network ip interface set -m 9000 -i vmk2
Jumbo frames needs to be configured end-to-end, which includes all network switches along the way. In my lab I use two Force10 cables to connect my NAS host directly to my ESXi server, but this may not always been the case. More often than not, a networking switch will also need to be configured.
In our datacenters we use Cisco networking equipment. The following example assumes your NAS host is connected to ports Gi1/0/1 and Gi2/0/1, and your ESXi host is connected to ports Gi1/0/5 and Gi2/0/5 respectively:
conf t
interface gi1/0/1
mtu 9000
interface gi2/0/1
mtu 9000
interface gi1/0/5
mtu 9000
interface gi2/0/5
mtu 9000
Finally, we need to verify jumbo frames has been configured correctly. To do so, use the following command on an ESXi host:
vmkping -s 8972 -d 192.168.86.14
The option -s specifies the packet size, and -d disables IP fragmentation. If everything is configured correctly, you will get a response like:
PING 192.168.86.14 (192.168.86.14): 8972 data bytes
8980 bytes from 192.168.86.14: icmp_seq=0 ttl=64 time=0.516 ms
8980 bytes from 192.168.86.14: icmp_seq=1 ttl=64 time=0.552 ms
8980 bytes from 192.168.86.14: icmp_seq=2 ttl=64 time=0.462 ms
If not, you’ll get something like this:

The packet size is calculated as follows:
9000 (MTU size) – 8 (ICMP header) – 20 (IP header) = 8972 bytes
vStorage API for Array Integration
vStorage API for Array Integration (VAAI) is an application program interface (API) framework from VMware that enables certain storage tasks, such as thin provisioning, to be offloaded from the VMware server virtualization hardware to the storage array.
VAAI offers the following support:
- Atomic Test & Set (ATS), which is used during creation and locking of files on the VMFS volume
- Clone Blocks/Full Copy/XCOPY, which is used to copy or migrate data within the same physical array
- Zero Blocks/Write Same, which is used to zero-out disk regions
- Thin Provisioning in ESXi 5.x and later hosts, which allows the ESXi host to tell the array when the space previously occupied by a virtual machine (whether it is deleted or migrated to another datastore) can be reclaimed on thin provisioned LUNs.
- Block Delete in ESXi 5.x and later hosts, which allows for space to be reclaimed using the SCSI UNMAP feature
For more information, see VMware Knowledgebase article 1021976.
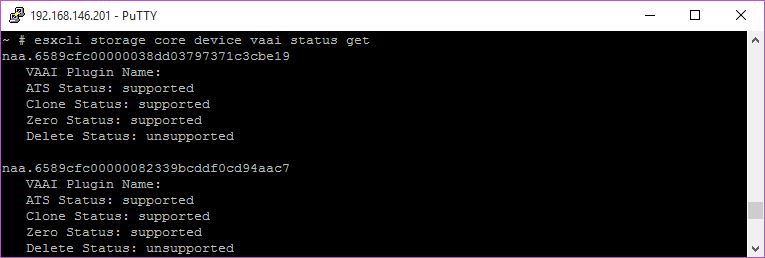
FreeNAS 9.3 now fully supports all 7 VAAI (vStorage APIs for Array Integration) block primitives. To verify this, use the following command:
esxcli storage core device vaai status get
This should show something like:
Path Selection Policy
If you are using multipath IO (MPIO) with iSCSI, then the next thing to consider is the Path Selection Policy (PSP).
By default, VMware provides three PSPs:
- Most Recently Used
- Fixed
- Round Robin
To achieve the best performance with iSCSI, the best practice is to use Round Robin (RR) and spread the IO per second (IOPS). This enables us to use multiple paths for active storage traffic.
By default, Round Robin sends all IOPS down a single active path until a limit is reached (the IO Operation Limit). At this point RR chooses the next path and the cycle starts again.
By configuring the limit to a lower value, we can increase disk IO throughput by effectively spreading the load across multiple paths.
To set the PSP using the CLI, first list the iSCSI LUNs:
esxcli storage core device list | grep naa
This will display a number of disks, of which we need the device ID of the iSCSI ones. Choose one as an example and define a variable for it (substitute accordingly):
DEV=naa.6589cfc00000038dd03797371c3cbe19
Configure the PSP:
esxcli storage nmp device set -d $DEV -P VMW_PSP_RR
If you have a large number of hosts in a cluster to configure, use the following PowerCLI script (substitute accordingly):
# Variables
$vc = "vc2.uk.mdb-lab.com"
$credential = Get-Credential
$psp = "RoundRobin"

# Connect to the vCenter
Connect-VIServer $vc -Credential $credential

# Define the cluster
$cluster = "London_Lab"

# Retrieve disks and their associated PSP
Get-Cluster $cluster | Get-VMHost | Get-ScsiLun -LunType "disk" | where {$_.MultipathPolicy -ne $psp} | Format-Table CanonicalName,CapacityGB,Multipathpolicy -AutoSize

# Set the PSP to Round Robin
Get-Cluster $cluster | Get-VMHost | Get-ScsiLun -LunType "disk" | where {$_.MultipathPolicy -ne $psp} | Set-ScsiLun -MultipathPolicy $psp

# Disconnect from the vCenter
Disconnect-VIServer $vc
Now we need to configure the IO Operation Limit. To check the current value, use:
esxcli storage nmp psp roundrobin deviceconfig get -d $DEV
This should show something like:

The default IO Operation Limit is 1000 IOPS. Change this to 1 IOP using:
esxcli storage nmp psp roundrobin deviceconfig set -d $DEV -t iops -I 1
Confirm the configuration has changed:

That’s it for the time being. As mentioned above, please feel free to add your own suggestions.

Since I’ve given up on VSAN (for now!), I was wondering, what sort of performance did you get with FreeNAS and ESXi? Did you use iSCSI? I was thinking of using two 1Gbps NICs on the FreeNAS server and using all SSD disks for storage. Would I be able to get up to 250MB/s disk speeds when using both NICs?
LikeLike
I got decent performance, however I was using iSCSI with 10GbE NICs. I’m thinking that if you’re using 1GbE NICs that might be the bottleneck…
-Mark
LikeLike
What kind of performance were you getting with FreeNAS and 10GbE NICs? I assume you were using SSD storage.
Heres a question: If I have two ESXi hosts and each one has a 10GbE NIC and my FreeNAS server has two 10GbE NICs, could I run a crossover cable from ESXi1 to 10GbE port1 on the FreeNAS server and then another crossover cable from ESXi2 to 10GbE port2 on the FreeNAS server using iSCSI?
Just wondering if I could do this so I wouldn’t need to buy a 10GbE switch!
LikeLike
Hmmm, I don’t know to be honest.
Yes in theory configuring the VMkernel ports and getting IP connectivity up and running should be simple enough, but I think a FreeNAS extent can only be associated with one target at a time. In this scenario you would have two targets…
I’m not sure. Give it a go and let me know! 🙂
-Mark
LikeLike