 A number of customers are very excited about the upcoming release of PKS. However, some are itching to get started with Kubernetes today, and are wondering how they can leverage VMware’s Cloud Management Platform, vRealize Automation, to do so. In this post I will show how you can design a blueprint which with two clicks can deploy a Kubernetes cluster for your users.
Kubernetes is an open-source system for automating deployment, scaling, and management of containerized applications.
It groups containers that make up an application into logical units for easy management and discovery. Kubernetes builds upon fifteen years of experience of running production workloads at Google, combined with best-of-breed ideas and practices from the community.
Getting Started
The blueprint we will create in this post will consist of multiple machines running Linux (in my case, CentOS). It will then deploy one Kubernetes master and a number of worker nodes. Each machine will run a script (software component), which based on the role assigned to it, will install and configure the relevant software.
The only decision the requester has to make is to decide the master’s hostname (in this example), how many slaves they’d like to deploy, and if they’d like to deploy the Kubernetes Dashboard.
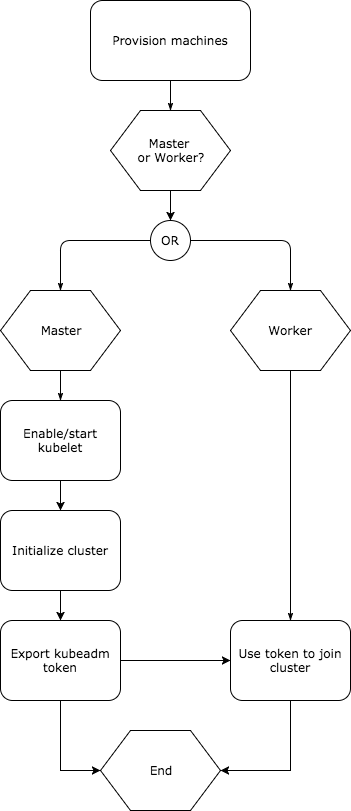
The provisioning workflow will be as follows:
For this we will need:
- 1 x custom property
- 2 x software components
- 1 x multi-machine blueprint
The first job is to define a custom property to enable the requester to decide if they’d like to deploy the Kubernetes Dashboard with their cluster deployment.
In vRealize Automation click the Administration tab, followed by Property Dictionary and then Property Definitions. Click New.
Give the property a name (in my example I use a prefix of “hc.”), and set the label to a nice-looking display name. Define the data type of boolean, and choose to display it as a checkbox:

Software Component
The majority of the provisioning work is done by the software component, and that is where the code will be configured.
Create a new software component, and define the following properties:

Make sure nToken is marked as a computed value.
On the Actions tab, edit the Install script and use the following:
#!/bin/bash

# Install yum-utils
if ! rpm -qa | grep -qw yum-utils; then
/usr/bin/yum install -y yum-utils
fi

# Configure repo
if [ -f /etc/yum.repos.d/kubernetes.repo ]; then
# Enable Kubernetes repo
/usr/bin/yum-config-manager --enable Kubernetes
else
# Create and enable Kubernetes repo
cat <<EOF> /etc/yum.repos.d/kubernetes.repo
[kubernetes]
name=Kubernetes
baseurl=https://packages.cloud.google.com/yum/repos/kubernetes-el7-x86_64
enabled=1
gpgcheck=1
repo_gpgcheck=1
gpgkey=https://packages.cloud.google.com/yum/doc/yum-key.gpg
https://packages.cloud.google.com/yum/doc/rpm-package-key.gpg
EOF
fi

# Install Kubernetes and Docker
/usr/bin/yum install kubeadm docker -y

# Enable service
/usr/bin/systemctl enable docker

# Start service
echo "Starting Docker"
/usr/bin/systemctl start docker
/usr/bin/docker version

# Disable Kubernetes repo
/usr/bin/yum-config-manager --disable kubernetes
This does the following:
- If yum-utils is not installed, install it
- If a repo does not exist for Kubernetes, create one
- Installs Kubernetes and Docker
- Enables and starts the Docker service
- Disables the Kubernetes repo
Click Next > to move to the Configure tab and use:
#!/bin/bash

# Set a proper PATH, 'cos vRA um, doesn't...
export PATH=/usr/local/sbin:/usr/local/bin:/sbin:/bin:/usr/sbin:/usr/bin

# Checks if this host is the Master
if [ $role == "Master" ]; then
    echo "This host is the master, running kubeadm init"
    # Enable and start the services
    /usr/bin/systemctl enable kubelet
    /usr/bin/systemctl start kubelet
    # Disable system swap
    /usr/sbin/swapoff -a
    # Initialize cluster
    /usr/bin/kubeadm init
    # Get Kubernetes version
    export KUBECONFIG=/etc/kubernetes/admin.conf
    export kubever=$(kubectl version | base64 | tr -d '\n')
    # Install pod network
    /usr/bin/kubectl apply -f "https://cloud.weave.works/k8s/net?k8s-version=$kubever"
    # Export token for joining the cluster
    nToken=$(kubeadm token create --print-join-command)
    export nToken
else
    echo "This host is a node, joining Kubernetes cluster"
    # Disable system swap
    /usr/sbin/swapoff -a
    # Joining node to cluster
    $nTokenN
fi
The above contains the actual logic of the software component. The first step is to set a proper path for the script to use. Then depending on the role assigned to the property we decide on whether to install the master or worker node.
If the Master is selected we enable and start the kubelet service, disable the system swap and initialize the cluster. We then export a variable for the kubectl admin tool to use, and then ascertain what version of Kubernetes we are using. Once we have that the scripts downloads the appropriate network overlay in YAML format and installs the Pod network. Finally we export the token that the worker nodes will use to securely join the cluster.
If the custom property is set to Worker, then the swap is also disabled and the contents of the nTokenN variable are run. This joins the worker node to the cluster.
Blueprint
Create a new blueprint, giving it a name and description so that users can easily understand what it is in the service catalog.
Note: you may want to enable debugging whilst setting this up, as defined here.
Drag two vSphere machines onto the canvas. Name one Master and the other Workers. Also include a network of your choice:
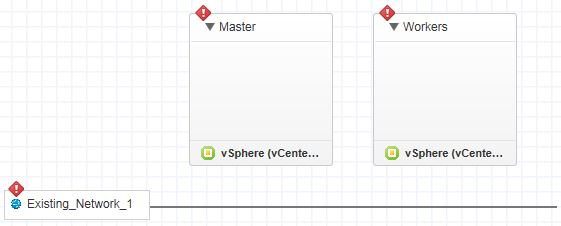
So far, so good
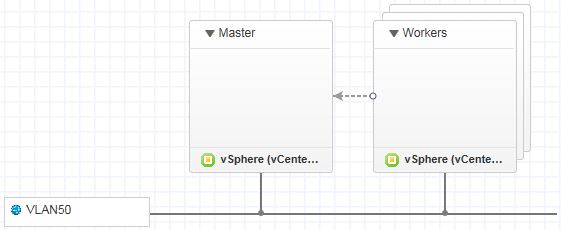
Define the build information and machine resources for each vSphere Machine. In my development environment I prefer to use linked clones to ensure provisioning is as fast as possible. For the worker machine, set the instances to be a minimum of three.
Configure the network and connect the vSphere Machines to it. Finally, make the Workers a dependancy of the Master by connecting the two:
I have previously defined a software component named System Configuration which disables SELinux and the system firewall. If you’re unfamiliar with it, it consists of a single script using the following:
#!/bin/bash

# Disable SELinux
/bin/sed -i "s/SELINUX=enforcing/SELINUX=permissive/g" /etc/selinux/config
/usr/sbin/setenforce 0

# Stop and disable firewalld
/usr/bin/systemctl stop firewalld
/usr/bin/systemctl disable firewalld
Drag this software component onto each vSphere Machine on the canvas.
Edit the Master vSphere Machine, click the Properties tab, followed by Custom Properties. Click New, and from the dropdown list select the custom property we created above for the dashboard (in my case, hc.dashboard).
The Main Event
Drag the Kubernetes software component you created earlier onto each vSphere Machine, renaming each one to Kubernetes_Master and Kubernetes_Worker respectively.
Select the Kubernetes_Master software component and click the Properties tab. Edit the role property and set the value to Master. Leave nTokenN unchanged.
Select Kubernetes_Worker and again click the Properties tab. Select role, and set it to Node.
Whilst editing the Kubernetes_Worker software component, edit the nTokenN property and check the Binding box. In the Value field enter _resource~Kubernetes_Master~nTokenN. As you begin to type it should auto-complete for you.
Next, drag the connector from Kubernetes_Worker to Kubernetes_Master, making the former dependant on the latter.
Finally click OK, followed by Save and then Finish.

Voilà!
The last step is to publish the blueprint and entitle it. It will then appear in your service catalog for your users to consume.
Kubernetes Dashboard
As it currently stands, the new blueprint will successfully deploy a new Kubernetes cluster consisting of one master and three or more workers:

Success!
To verify this, log in to the master and run:
export KUBECONFIG=/etc/kubernetes/admin.conf
kubectl get nodes
This should return something like:

Whilst this is all well and good, the cluster itself doesn’t do much until we provision workloads to it. A good example of one is the Kubernetes Dashboard.
Create a new software component called Kubernetes Dashboard and define the following custom properties both of type string:
- dashboard
- url
Leave the value for dashboard blank, and set the url to:
Create an Install script and use the following:
#!/bin/bash

# Set a proper PATH, 'cos vRA um, doesn't...
export PATH=/usr/local/sbin:/usr/local/bin:/sbin:/bin:/usr/sbin:/usr/bin

# Checks to see if Kubernetes Dashboard is required
if [ $dashboard == true ]; then
        echo "Kubernetes Dashboard is required, installing"
        export KUBECONFIG=/etc/kubernetes/admin.conf
        # Deploy the dashboard
        kubectl create -f $url
else
        echo "Kubernetes Dashboard is not required"
fi
This will download the Kubernetes Dashboard YAML file and apply it to the cluster.
Next, create a configure script with the following:
#!/bin/bash

# Set admin variable
export KUBECONFIG=/etc/kubernetes/admin.conf

# Create RBAC rules
cat <<EOF | kubectl create -f -
apiVersion: rbac.authorization.k8s.io/v1beta1
kind: ClusterRoleBinding
metadata:
name: kubernetes-dashboard
labels:
k8s-app: kubernetes-dashboard
roleRef:
apiGroup: rbac.authorization.k8s.io
kind: ClusterRole
name: cluster-admin
subjects:
- kind: ServiceAccount
name: kubernetes-dashboard
namespace: kube-system
EOF

# Expose Dashboard outside the cluster
kubectl patch service kubernetes-dashboard -n kube-system -p '{"spec":{"type":"NodePort"}}'

# Get external port
nodePort=$(kubectl get services kubernetes-dashboard -n kube-system -o jsonpath='{.spec.ports[0].nodePort}')

# Get token
dashToken=$(kubectl -n kube-system describe secret $(kubectl -n kube-system get secret | awk '/^kubernetes-dashboard-token-/{print $1}') | awk '$1=="token:"{print $2}')

echo
echo
echo "Use your browser to connect to the Kubernetes Master on TCP/"$nodePort
echo
echo "Once connected, use the following token to authenticate:"
echo
echo $dashToken
First we create the necessary role-based access controls for the namespace. We then expose the service to the external IP so that our users can access the dashboard. Finally we retrieve the external TCP/IP port and bearer token so we can access the dashboard in our browser.
Click Finish.
Edit the Kubernetes blueprint. Select our newly created dashboard software component and drag it onto the Master vSphere Machine.
Once in place, select the software component and click the Properties tab. Edit the dashboard custom property and click Binding. In the value box use the down arrow to select the Master vSphere Machine follwed by a tilde (~). Use the down arrow once more to select the custom property we created at the beginning (in my case hc.dashboard). Once configured it should look like:

Custom property on the software component is bound to the property on the Master
Finally, make the dashboard software component dependant on the Kubernetes_Node:

Click Save and then Finish.
Up and running
Deploy the blueprint from the service catalog. Once it has finished, select the request and find the step regarding the Kubernetes Dashboard. Click on the Configure tab to get the details:

Copy and paste the token
Using your browser, navigate to an IP and port of one of the workers. When asked to authenticate, copy and paste the bearer token. Once authenticated you should see the Kubernetes Dashboard running on your new cluster.

Done!
Happy clustering!

Pingback: Newsletter: February 10, 2018 – Notes from MWhite
I LOVE the post! Your tutorial has saved me hours of work. Thank you.
I noticed that you mentioned – edit the nTokenN property and check the Binding box. In the Value field enter _resource~Kubernetes_Master~nTokenN. I could not get this to work until I changed the binding variable to _resource~Kubernetes_Master~nToken. Perhaps I missed something myself.
FYI
LikeLike
Hi Christian. Thanks… I’m glad you found it useful.
Let me check my setup. Maybe I made a typo (very likely).
LikeLike
Pingback: Moving vRealize Automation blueprints between environments with vRealize Suite Lifecycle Manager 1.2 | virtualhobbit
Pingback: Deploy an Azure Kubernetes Service cluster from vRealize Automation – Part 1: Authentication | virtualhobbit