 In previous consultancies I’ve worked, it was common practice to frequently patch corporate VDI templates. Whilst continuous patching is a good thing, it is quite often laborious. Any attempt to automate this is seen as difficult and organizations often give up and continue with manual processes. Here I will show how it can be done using Code Stream and HashiCorp Packer.
Other posts in this series:
Background
In HobbitCloud we use a mixture of Windows and Linux VDI desktops. Whilst the latter is my desktop of choice, some users still prefer Redmond’s offering.
To offer the most cost-efficient solution in terms of storage and manageability, we use linked-clone desktops with applications provided by VMware AppVolumes. This enables us to provision a clean base image, with all applications installed in an AppStack. While not every application is suitable for an AppStack (I would always put Microsoft Office/365 into the base image), fortunately the standard apps we use are.
Therefore all we need to build is a Windows 10 desktop, patched with the latest updates, with the AppVolumes, Dynamic Environment Manager and VMware Horizon Agents installed. Once we become familiar with how to build the solution in a scripted fashion, we can leverage VMware’s continuous delivery tool, Code Stream, to automate the process.
What we’ll need:
- HashiCorp Packer
- JetBrains Packer Builder for vSphere
- JSON configuration file
- JSON file for variables
- Windows 10 ISO
- Windows Autounattend.xml file
- VMware Tools
- Various scripts (for VMware Tools, agents etc)
- AppVolumes, DEM, Horizon Agents
- Access to VMware Code Stream
- (Optional) access to VMware vRealize Automation Cloud
Please note: be sure to choose the correct VMware Tools and software agents for your Horizon environment. Consult the support matrix where necessary.
Solution Overview
Here is a high-level plan for how the solution will work:

Getting Started
Create a folder with a meaningful name in your filesystem. I have gone with $HOME/git/packer/windows-10. This will be our root folder.
Download Packer 1.4.2 and unzip it to the root folder. Also download the JetBrains Packer Builder for vSphere (link above) and save it to the same folder.
Next, create a JSON file called windows-10.json with the following and save it to the root folder:
{
    "builders": [
      {
        "type": "vsphere-iso",

        "vcenter_server":      "{{user `vcenter_server`}}",
        "username":            "{{user `username`}}",
        "password":            "{{user `password`}}",
        "insecure_connection": "true",

        "vm_name": "Windows 10 (LC) (PILOT)",
        "datastore": "{{user `datastore`}}",
        "create_snapshot": "false",
        "cluster": "{{user `cluster`}}",
        "network": "{{user `network`}}",
        "boot_order": "disk,cdrom",

        "vm_version":       15,
        "guest_os_type": "windows9_64Guest",

        "communicator": "winrm",
        "winrm_username": "{{user `winrm_username`}}",
        "winrm_password": "{{user `winrm_password`}}",

        "CPUs":             2,
        "RAM":              8192,
        "RAM_reserve_all":  true,

        "disk_controller_type":  "pvscsi",
        "disk_size":        51200,
        "disk_thin_provisioned": true,

        "network_card": "vmxnet3",

        "iso_paths": [
        "[{{user `datastore_iso`}}] en-gb_windows_10_business_editions_version_1903_x64_dvd_4170a06f.iso",
        "[{{user `datastore_iso`}}] VMware-tools-windows-10.3.10-12406962.iso"
        ],

        "floppy_files": [
          "{{template_dir}}/setup/"
        ],
        "floppy_img_path": "[{{user `datastore`}}] Floppies/pvscsi-Windows8.flp"
      }
    ],

    "provisioners": [
      {
        "type": "powershell",
        "inline": [
          "Get-AppXPackage -AllUsers | Where {($_.name -notlike \"Photos\") -and ($_.Name -notlike \"Calculator\") -and ($_.Name -notlike \"Store\")} | Remove-AppXPackage -ErrorAction SilentlyContinue",
          "Get-AppXProvisionedPackage -Online | Where {($_.DisplayName -notlike \"Photos\") -and ($_.DisplayName -notlike \"Calculator\") -and ($_.DisplayName -notlike \"Store\")} | Remove-AppXProvisionedPackage -Online -ErrorAction SilentlyContinue"
        ]
      },
      {
        "type": "powershell",
        "scripts": [
          "{{template_dir}}/setup/certs.ps1",
          "{{template_dir}}/setup/appvolumes.ps1",
          "{{template_dir}}/setup/dem.ps1",
          "{{template_dir}}/setup/agent.ps1",
          "{{template_dir}}/setup/updates.ps1"
        ]
      }
    ]
}
Things to note:
- Line 11: here’s where you specify what you want the virtual machine to be named (substitute accordingly)
- Lines 25-26 and 30: here’s where you size your VM. 2 vCPUs, 8GB RAM and 50GB disk is the HobbitCloud default
- Lines 36-37: the Windows and VMware Tools ISO need to exist on a datastore of your choosing
- Line 42: this is where we will store our scripts (more on this later)
- Lines 51-52: some PowerShell commands for hacking out all the unnecessary Windows garbage. Delete as necessary.
- Line 58 onwards: these call out the scripts we will be using. Feel free to include/exclude as necessary. I would remove them all at first, get the solution working, then add them one at a time.
Create a JSON file named variables.json and add the following (substitute accordingly):
{
    "vcenter_server":"nl-utc-p-mgt-01.nl.mdb-lab.com",
    "username":"vcenter_user",
    "password":"VMware1!",
    "datastore":"vsanDatastore",
    "datastore_iso":"ISO",
    "cluster": "Management",
    "network": "VLAN70",
    "winrm_username": "Administrator",
    "winrm_password": "VMware1!"
}
Things to note:
- Lines 9-10: these need to match what is defined in Autounattend.xml file (see next section)
Windows 10
Now we need to start defining how our Windows 10 box will be built. Before we do that, upload the Windows 10 and VMware Tools ISOs (defined in windows-10.json) to the datastore defined in variables.json. As I configure my Windows desktop to use the pvscsi driver, you will also need to upload the floppy image for this too. This is defined at line 43 of windows-10.json, but if you don’t use it you can ignore that and hack it out.
Create a folder under the root folder called setup. Download the Autounattend.xml file from here and save it to this folder.
Create a command script called vmtools.cmd in the setup folder using:
@rem Silent mode, basic UI, no reboot
e:\setup64 /s /v "/qb REBOOT=R"
Lastly, create a PowerShell script called setup.ps1 with the following and save it to the setup folder:
$ErrorActionPreference = "Stop"

# Switch network connection to private mode
# Required for WinRM firewall rules
$profile = Get-NetConnectionProfile
Set-NetConnectionProfile -Name $profile.Name -NetworkCategory Private

# Enable WinRM service
winrm quickconfig -quiet
winrm set winrm/config/service '@{AllowUnencrypted="true"}'
winrm set winrm/config/service/auth '@{Basic="true"}'

# Reset auto logon count
# https://docs.microsoft.com/en-us/windows-hardware/customize/desktop/unattend/microsoft-windows-shell-setup-autologon-logoncount#logoncount-known-issue
Set-ItemProperty -Path 'HKLM:\SOFTWARE\Microsoft\Windows NT\CurrentVersion\Winlogon' -Name AutoLogonCount -Value 0
You should now have enough to stand up the base build.
Try it…
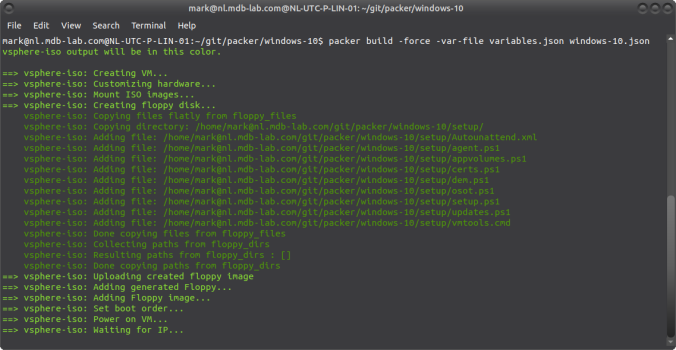
In the root folder, run the following:
packer build -force -var-file variables.json windows-10.json
If all goes well, then you should get some green text appearing in your terminal window:
Coming up
In part 2 of this series will install our VDI agents, before moving on to automate the entire solution in part 3.

Pingback: vToolbelt - October 2019 - Cybersylum
Pingback: Newsletter: October 5, 2019 – Notes from MWhite
Pingback: Automating VDI Template Creation with VMware Code Stream and HashiCorp Packer – Part 2: Installing the VDI Agents | virtualhobbit
Pingback: Automating VDI Template Creation with VMware Code Stream and HashiCorp Packer – Part 3: Automating the Solution | virtualhobbit
Quick question – why are you calling your PowerShell scripts from the {{template_dir}} instead of from the floppy disk that gets mounted to the image throughout the build process? From my understanding including the scripts in the floppy_files would attach them locally and packer wouldn’t need to transfer the script files across WinRM as they are already there. Just a thought that I had while trying to replicate your process myself.
Great blog post and it’s been working great regardless!
LikeLike
At one point I ran into the size limitation of floppy disks so I had to find a workaround 🙂
LikeLike
Thank you so much for sharing this post.
I am newby coder/administrator and decided to test your solution in my lab.
It worked quite well but I needed to use the v1.4 HashiCorp Packer. The newwer v1..7 complained about something to do with the use of the protocols.
I encountered on problem with running the updates.ps1 script under WinRM. For some I keep getting the below error when Get-WindowsUpdate command is run. After a few seconds, it does proceed with querying Windows Update and lists all the updates that need to be applied but they never get installed and eventually the VM get shutdown.
Get-WindowsUpdate : Access is denied. (Exception from HRESULT: 0x80070005 (E_ACCESSDENIED))
==> vsphere-iso: At C:\Windows\Temp\script-60492ac7-28a7-40fd-3b78-b11b53da5afb.ps1:13 char:1
==> vsphere-iso: + Get-WindowsUpdate -Install -AcceptAll -IgnoreReboot
I then tested the same command by logging in locally as the local Administrator the same as the one in the Autounattend.xml file and I am able to successfully able to get them downloaded and installed on the VM.
I checked the net and arrived at the conclusion that this is known issue without a fix.
Would appreciate it if you are able to shed any light on the above issue I am having.
LikeLike
Hi Mike. There’s an updated version (0.11.0) of the Windows Update provisioned for Packer 1.7.0. You can get it here: https://github.com/rgl/packer-provisioner-windows-update.
Sounds like when you call the WU Proovisioner it might need elevated privileges. If so, try this:
“type”: “powershell”,
“elevated_user”: “{{user `winrmUser`}}”,
“elevated_password”: “{{user `winrmPass`}}”,
“inline”: [
“<>”
]
},
Insert the relevant commands, obvs 🙂
LikeLike
Sorry, try this:
{
“type”: “powershell”,
“elevated_user”: “{{user `winrmUser`}}”,
“elevated_password”: “{{user `winrmPass`}}”,
“scripts”: [
“{{template_dir}}/setup/updates.ps1”
]
},
LikeLike
Pingback: Minimal Touch VDI Image Building With MDT, PowerCLI, and Chocolatey | The Virtual Horizon
Pingback: EUC Weekly Digest – November 16, 2019 – Carl Stalhood
Pingback: Using GitLab CI/CD Pipelines to Automate your HashiCorp Packer Builds | virtualhobbit
Pingback: My Golden Image build using HashiCorp Packer – Retouw.nl
Pingback: Using Continuous Deployment to Provision VDI Desktops | virtualhobbit
Pingback: Managing Windows hosts using Ansible Tower/AWX and SSH | virtualhobbit
Thank you for your speedy reply.
I tried changing it to open in elevated mode but for some reason I continue to get the Access Denied error. I have even disabled UAC in Autounattend.xml but still seeing the same below result.`It queries for the updates but does not download or install any of them and the build completes and shutdown.
Get-WindowsUpdate : Access is denied. (Exception from HRESULT: 0x80070005 (E_ACCESSDENIED))
==> vsphere-iso: At C:\Windows\Temp\script-604a7d15-9a75-cf63-166f-a2c1e46350ec.ps1:17 char:1
==> vsphere-iso: + Get-WindowsUpdate -Install -AcceptAll -IgnoreReboot
==> vsphere-iso: + ~~~~~~~~~~~~~~~~~~~~~~~~~~~~~~~~~~~~~~~~~~~~~~~~~~~
vsphere-iso: Status : A——
==> vsphere-iso: + CategoryInfo : NotSpecified: (:) [Get-WindowsUpdate], UnauthorizedAccessException
==> vsphere-iso: + FullyQualifiedErrorId : System.UnauthorizedAccessException,PSWindowsUpdate.GetWindowsUpdate
vsphere-iso: ComputerName : DESKTOP-VMRCE9V
==> vsphere-iso:
vsphere-iso: KB : KB4580325
vsphere-iso: X : 1
vsphere-iso: ChooseResult : Accepted
vsphere-iso: Result : Accepted
vsphere-iso: Title : 2020-10 Security Update for Adobe Flash Player for Windows 10 Version 1903 for
vsphere-iso: x64-based Systems (KB4580325)
vsphere-iso: AutoSelectOnWebSites : True
vsphere-iso: BundledUpdates : System.__ComObject
vsphere-iso: CanRequireSource : False
vsphere-iso: Categories : System.__ComObject
vsphere-iso: Deadline :
vsphere-iso: DeltaCompressedContentAvailable : False
vsphere-iso: DeltaCompressedContentPreferred : True
vsphere-iso: Description : A security issue has been identified in a Microsoft software product that could
vsphere-iso: affect your system. You can help protect your system by installing this update from
vsphere-iso: Microsoft. For a complete listing of the issues that are included in this update,
vsphere-iso: see the associated Microsoft Knowledge Base article. After you install this update,
vsphere-iso: you may have to restart your system.
vsphere-iso: EulaAccepted : True
vsphere-iso: EulaText :
vsphere-iso: HandlerID :
vsphere-iso: Identity : System.__ComObject
vsphere-iso: Image :
vsphere-iso: InstallationBehavior : System.__ComObject
vsphere-iso: IsBeta : False
vsphere-iso: IsDownloaded : False
vsphere-iso: IsHidden : False
vsphere-iso: IsInstalled : False
vsphere-iso: IsMandatory : False
vsphere-iso: IsUninstallable : False
vsphere-iso: Languages : System.__ComObject
vsphere-iso: LastDeploymentChangeTime : 13/10/2020 00:00:00
vsphere-iso: MaxDownloadSize : 22203043
vsphere-iso: MinDownloadSize : 0
vsphere-iso: MoreInfoUrls : System.__ComObject
vsphere-iso: MsrcSeverity : Critical
vsphere-iso: RecommendedCpuSpeed : 0
vsphere-iso: RecommendedHardDiskSpace : 0
vsphere-iso: RecommendedMemory : 0
vsphere-iso: ReleaseNotes :
vsphere-iso: SecurityBulletinIDs : System.__ComObject
vsphere-iso: SupersededUpdateIDs : System.__ComObject
vsphere-iso: SupportUrl : https://support.microsoft.com/help/4580325
vsphere-iso: Type : 1
vsphere-iso: UninstallationNotes : This software update can be removed by selecting View installed updates in the
vsphere-iso: Programs and Features Control Panel.
vsphere-iso: UninstallationBehavior : System.__ComObject
vsphere-iso: UninstallationSteps : System.__ComObject
vsphere-iso: KBArticleIDs : System.__ComObject
vsphere-iso: DeploymentAction : 1
vsphere-iso: DownloadPriority : 2
vsphere-iso: DownloadContents : System.__ComObject
vsphere-iso: RebootRequired : False
vsphere-iso: IsPresent : False
vsphere-iso: CveIDs : System.__ComObject
vsphere-iso: BrowseOnly : False
vsphere-iso: PerUser : False
vsphere-iso: AutoSelection : 0
vsphere-iso: AutoDownload : 0
vsphere-iso:
LikeLike
Hi Mark,
I just realized that you had mentioned that I should use the updated version (0.11.0) of the Windows Update packer. That is why the Windows updates may not be installing using the previous method.
I downloaded the new Provisioner and placed it in the $home\git\packer\windows-10 folder, but can’t seem to figure out how to implement it in the script. In the creators github he provides and example:
Could do with your help on this one please. If I can figure this out, I can move forward with building my test VM.
Many thanks!
LikeLike
If you’ve downloaded the file and placed it in the windows-10 folder, it should just work (apologies – I don’t use Window so I’m not entirely sure).
Alternatively, place it in the folder you’re running the Packer executable from.
Try that and let me know how you get on.
LikeLike
Hi Mark,
Thanks for your reply. Yes, I know what you mean about not using Windows. If only the legacy apps are eliminated, it would be so much better 🙂
I did try doing what you suggested but seem to be having issues with versioning of the Packer and the vsphere-iso Plugin. There appears to be some incompatibilites between each other.
I have the following files in my folder:
Packer v1.7.0
v2.3 of Jetbrains vsphere.iso plugin
(0.11.0) packer-provisioner-windows-update
I get the below error complaining about support for the vsphere-iso version has been deprecated.
When I run the basic script just to build the VM without Windows Updates I get the below error complaining I need to downgrade to v1.4 of Packer which does work.
C:\$home\git\packer\windows-10>1.7packer.exe validate .\Windows-10-Test-Pilot_v1.json
Error: Failed to initialize build “vsphere-iso”
error initializing builder ‘vsphere-iso’: The protocol of this plugin (protocol
version 4 and lower) was deprecated, please use a newer version of this
plugin.Or use an older version of Packer (pre 1.7) with this plugin.
Then I tested using v1.4 of Packer but this time I am using the windows-update plugin but then it is complaining again about some incompatiblity.
C:\$home\git\packer\windows-10>1.4packer.exe validate .\Windows-10-Test-Pilot_v1.json
Failed to initialize build ‘vsphere-iso’: error initializing provisioner ‘windows-update’: Incompatible API version with plugin. Plugin version: 5, Ours: 4
It looks like getting the Windows-Updates plugin is having issues and the latest Packers is also not compatible with v2.3 vsphere-iso plugin.
Kind of scratching my head but I have barely any hair left 🙂
Cheers!
LikeLike
Hi Mike,
You shouldn’t be using the JetBrains vsphere-iso plugin. The functionality was deprecated and merged into Packer 1.5.2
See here: https://github.com/jetbrains-infra/packer-builder-vsphere
LikeLike
Hi Mark,
Thank you for your reply.
I must admit I didn’t read the information about the vsphere-iso pluging was deprecated. Because I don’t quite have a good understanding of these tools – I simply downloaded it and kept using the old script which was referencing “vsphere-iso” As always, it is always something very “silly” 🙂
I used the Packer fix and exported the old script and ran it and it did its magic and windows-update also seemed have run successfully. On closer inspection of the actual updates installed against what was displayed. I found only one update was installed. I haven’t had a chance to figure out why but will spend sometime and report back.
Almost gave up thinking that this was too fiddley and complicated compared to the MDT that I have been using for sometime. But thanks for your help, I am inspired to continue tinkering with these new gen tools.
Keep up the good work you are doing! I will be back for more help as move forward with the examples you have shared.
Cheers!
LikeLike
Hi Mark,
Thanks to you 🙂 I have managed to get a good understanding of how to use Packer for deploying VMs.
My next phase is to deploy applications/agents and used one of your scripts but seem to be having issues with running the scripts using WinRM. I setup IIS on my AD VM in my lab for storing the apps but having issues with fetching config files I think due to MIME settings etc. What type of web server are you are using in your lab?
With the Packer, do you know of a method to use use my existing MDT SMB share which contains the apps/agents. So as to either copy the files over to the VM and or run the scripts directly from the MDT Share as opposed to copying the installers locally to the VM and execute?
Thanks!
LikeLike
I run Apache on CentOS.
Apologies, no idea on MDT. My scripts download the files from the webserver and execute them locally without any issues.
https://github.com/virtualhobbit/packer-desktops/windows-10/setup
LikeLike
Hello Mark,
I have been using the “Invoke-WebRequest -Uri $url -OutFile C:\$PackageName” method but it seems to take quite a bit of time to transfer the files across from the webserver repository during the build.
Tried to use Start-BitsTransfer -Source $url -Destination $output – this method is superfast but it only seems to work when I run the script while logged in. I think there is some limitation with starting the BitsTransfer service without the user actually logged in and it fails when run by WinRM. I tried using the Elevated mode and even this seems to be failing.
If you have any tips on how to use this command in the remote script, would really appreciated it.
Thanks!
LikeLike
II’m sorry Ii don’t. IIRC, BITS is a Windows-only service, and I’m using Apache.
Does Invoke-WebRequest work, it just takes a while – or fail?
LikeLike
It works perfectly, no issues – just takes a while to download some of the bigger sized files.
I just managed to do the end to end build without appvolumes script and it took just over 1hr on my lab host. Would like to move on to the pipelining piece you have shared, but I don’t have access to VMware Code-Stream – do you know of any other similar solutions open source solutions I could try in my lab?
A side question, i see you are using Appvolumes in production. Do you deploy all the applications including office and the likes using AppVolumes? Will be grateful if you are able to share your experience.
I have been using MDT to build the VDI image end to end complete with all the applications and it has worked quite well – I was looking at evaluating AppVolumes but thought using a solution like that or AppV would be an extra admin overhead so I have refrained from it.
Thanks!
LikeLike
I am using GitLab in my environment for my pipeline. It’s incredibly simple to setup runs like a charm. I run GitLab EE as I have things like SAML auth and push/pulls from GitHub, but CE should suit your needs nicely.
I am using AppVolumes. Given the size, complexity and ubiquity of Office, I would place that in the base image, not an App Stack.
LikeLike
Hello Mark,
Thanks for your message. Sorry I was offline for a few days.
I am very facinated with the pipelining concept. I have got the basic image built figured out for the most part in my lab. I will look into GitLab, btw thanks for the mention.
Yes, I was also not quite sure of wanting to virtualize an app such as Office and it would be best deployed on the image itself. I don’t suppose you could share the script for installing Office using packer. Are you attaching the Office ISO and then running the setup using the .msp config file?
I was somewhat concerned about copying the entire office ISO locally and then deleting it. This would increase the size of the vmdk file by at least about 1.5GB and that wouldn’t this lead to consuming unecessary SAN storage space when cloned?
Thanks,
MP
LikeLike
Pingback: Build a vGPU enabled VM using Packer – Phil's Digital Workspace Blog
Hello Mark,
I have built my first few Horizon VDI using packer complete with all the application and all is well but noticed a strange behaviour.
When the user logs on to the brokered VDI session, during the logon process the screen display shows as if the Administrator user is being logged on instead of the user name of the account.
BTW I used the Administrator account as the packer build account.
Have you encountred this?
Thanks!
LikeLike
Hi Mike,
No I haven’t. Is this Windows or Linux?
Either way, it sounds like SSO is misconfigured…
LikeLike
Hi Mark,
Yes very strange behaviour.
From what I can see the out of the box SSO is working fine (I haven’t made any custom configuration) because the new user does login correctly and a new user profile gets created.
I am wondering could it be because the template VM is not joined to the domain so it defaults to the only local account there is on the VM which is “Administrator”?
MP
LikeLike
No the template shouldn’t be joined to the domain – the cloneprep/sysprep process will do that.
LikeLike
Hi Mark,
The Image is a Win10 and I am using Instant Clone non-persistent mode.
The new user does get created but for some reason during the logon process the new user sees the “Administrator” account displayed on the screen. So I think the SSO is working fine and the Image does get joined to the domain.
LikeLike
Hi Mike, How are you getting with this? All sorted?
LikeLike
Hello Mark,
Thank you for your follow up. For some reason I have not been able to change the behaviour.
One thing that came to my mind, but haven’t tested it because in my lab I don’t have profile management configured and I am wondering whether this could be the reason I am seeing the default user being displayed as Administrator.
I will give that a try and get back.
LikeLike