 Recently I’ve been working on improving HobbitCloud’s DevOps practices, specifically around committing code to version control and documenting it. Once a developer checks code in, this should compile, and if successful be deployed to the test environment. Once here it will undergo automated testing before progressing to staging for unit and integration tests.
A key step in this process is to ensure all code is thoroughly documented and available for all developers to see. This aids with code review by peers, which in turn improves the quality of code produced.
HobbitCloud uses Confluence internally to host documentation and GitLab for our continuous integration/delivery. By adding a few commands to our pipeline, we can ensure that successfully committed code can be imported directly into Confluence.
Enter JSDoc
The majority of code I write at the moment is for vRealize Orchestrator, which uses Javascript.
To document this we will use JSDoc, which is a markup language used to annotate JavaScript source code files. As long as we format our code properly and employ proper linting, this will produce quality documentation.
If you are interested in learning more about JSDoc then please have a look at https://devdocs.io/jsdoc.
Getting Started
The process for the solution will look something like this:

First, we will create the JSDoc from the Javascript (.js) file. Next, we will zip up the output folder, and then query the Confluence server to see if the code already exists. If it does, we will update the existing document. If not, we will create a new one.
Install Components
The method to install JSDoc and the necessary components differ depending on the operating system. To install on an Ubuntu distribution, use the following commands (substitute accordingly):
apt-get update
apt-get install -y npm zip curl jq
npm install -g jsdoc
Confirm JSDoc has been installed correctly using:
jsdoc --version
Install the Confluence Docs plugin
Login to Confluence as an administrator and click General Configuration. On the left-hand side, under Atlassian Marketplace, click Find new apps.
In the search box, search for Docs – Javadocs. When you find it, click on Free trial.
Once installed, click Docs – Organize on the left-hand side:
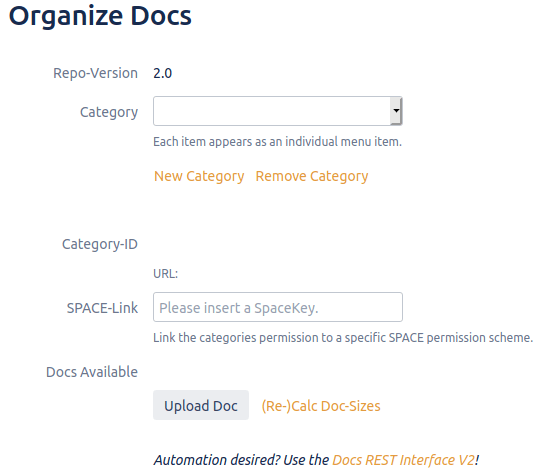
Click New Category and then give it a name (eg. vRO). Make a note of the category ID as this will be needed later.
The script
The code in the following scenario is designed to be run from a (Linux-based) container, therefore is based on a shell script.
First, we need to define the variables. It GitLab we can define these in the CI/CD section, but in Bash we will define them manually:
- cf_server
- cf_username
- cf_password
- cf_category
Once these have been defined, run the following script from the folder containing the Javascript (.js) files:
This file contains hidden or bidirectional Unicode text that may be interpreted or compiled differently than what appears below. To review, open the file in an editor that reveals hidden Unicode characters.
Learn more about bidirectional Unicode characters
| export cf_server="myServer" | |
| export cf_username="myUser" | |
| export cf_password="myPassword" | |
| export cf_category="c1001" | |
| for i in $(ls *.js); | |
| do | |
| j=$(echo $i | cut -f 1 -d '.'); | |
| jsdoc $i -d $j; | |
| zip -r $j.zip $j/; | |
| RESULT=$( curl -u $cf_username:$cf_password -X GET http://$cf_server/rest/docs/2.0/repository/$cf_category/findByName/$j | jq -r '.[] | .id' ); | |
| if [ -z $RESULT ]; | |
| then | |
| curl -u $cf_username:$cf_password -X PUT –upload-file $j.zip http://$cf_server/rest/docs/2.0/repository/$cf_category/$j; | |
| else | |
| curl -u $cf_username:$cf_password -X POST -H "X-Atlassian-Token":"nocheck" –upload-file $j.zip http://$cf_server/rest/docs/2.0/repository/$cf_category-$RESULT; | |
| fi; | |
| done |
Verifying the code in Confluence
Login to Confluence and click the Docs tab. Under the category you created previously you should see a list of the actions JSDoc has created. Select one:

On the right under Global, click the action name:

Here you will see the description, the inputs and what the action returns. To see the code, click the link to the Javascript source:

Once you add the above script to your pipeline, all code committed to version control can self-document – removing an important but yet often missed step in the development process.
