 When adding extensibility to your vRealize Automation platform, it’s important to get the basics right first. All too often it’s tempting to rush off and build complex blueprints whilst forgetting about the building blocks of good infrastructure, like naming and IPAM. Here I’m going to demonstrate how I do custom naming for workloads in my environment.
I’ve previously written about how an effective naming policy for enterprises is critical. However implementing this for the hybrid cloud is far from straightforward, and without the use of third-party tools, some coding will be required.
In a perfect world, the cloud management platform would feature some sort of integration with a configuration management system and would offload the naming policy and creation to that. However, systems such as those are complicated and costly to implement – so they are often used by only the largest of environments.
The following solution will demonstrate how this can all be achieved inside vRealize Automation without the use of external systems.
The Solution
The aim is to produce a naming convention similar to this based on workload type, which can either be specified at runtime or be embedded in the blueprint itself:

The above convention provides us with all the information we need to effectively name our workloads. It provides a country and site locator, an environment (dev/test/staging/production), the workload role, and the number.
As well as adhering to our naming policy, the solution needs to be site agnostic. For example, machines being spun up in the United Kingdom should not have a prefix of “NL”.
Whilst we won’t be using a CMDB of any kind, a record does need to be kept so the same name isn’t issued twice.
Getting Started
In vRealize Orchestrator, create a folder structure inside your configuration elements for vRA and naming. I have chosen the following:

Create a new element under Naming for each workload type you wish to provision. In each element, create an attribute called attNumber of type String. Set the initial value to “00”.
Also in the naming folder, create an element called Environment. Create a String attribute called attName and set the value to something like “Development”.
Actions
Create a folder for your naming actions (substitute accordingly):

Create an action named newNum, with an input called inNum, of type String. Set the return type to String. Paste in the following code:
This file contains bidirectional Unicode text that may be interpreted or compiled differently than what appears below. To review, open the file in an editor that reveals hidden Unicode characters.
Learn more about bidirectional Unicode characters
| var inc = "1"; | |
| var newNum = parseInt(inNum, 10) + parseInt(inc, 10); | |
| if ((newNum.toString()).length < 2){ | |
| newNum = "0" + newNum; | |
| } | |
| return newNum; |
Create a second action called renameVM. This time create two inputs: inVM of type String; and inVMEntity, of type vCAC:Entity. Set the return type to Any:
This file contains bidirectional Unicode text that may be interpreted or compiled differently than what appears below. To review, open the file in an editor that reveals hidden Unicode characters.
Learn more about bidirectional Unicode characters
| System.log("Updating VirtualMachineName to '" + inVM + "'."); | |
| //Get the properties of the vRA VM Entity object | |
| var vmEntityProps = inVMEntity.getProperties(); | |
| //Change the VirtualMachineName property by deleting it and re-adding it | |
| vmEntityProps.remove('VirtualMachineName'); | |
| vmEntityProps.put('VirtualMachineName', inVM); | |
| //Update the Entity object to save the change | |
| var hostId = inVMEntity.hostId; | |
| var modelName = inVMEntity.modelName; | |
| var entitySetName = inVMEntity.entitySetName; | |
| var entityIdString = inVMEntity.keyString; | |
| var actionResult = System.getModule("com.vmware.library.vcac").updateVCACEntity(hostId,modelName,entitySetName,entityIdString,vmEntityProps,null,null); | |
| System.log("Update of VirtualMachineName finished."); | |
| return actionResult; |
Create an additional folder, this time for some miscellaneous actions (substitute according):

Create an action called getConfigurationElement with three String inputs – inConfigurationElementName, inConfigurationElementPath and inName:
This file contains bidirectional Unicode text that may be interpreted or compiled differently than what appears below. To review, open the file in an editor that reveals hidden Unicode characters.
Learn more about bidirectional Unicode characters
| var category = Server.getConfigurationElementCategoryWithPath(inConfigurationElementPath); | |
| var elements = category.configurationElements; | |
| for each ( var element in elements) { | |
| if (element.name == inConfigurationElementName) { | |
| var configurationElement = element; | |
| } | |
| } | |
| var result = (configurationElement.getAttributeWithKey(inName).value); | |
| return result; |
Add another action, this time called setConfigurationElement. Specify four inputs, all of type String:
- inConfigurationElementName
- inConfigurationElementPath
- inName
- inValue
Paste in the following code:
This file contains bidirectional Unicode text that may be interpreted or compiled differently than what appears below. To review, open the file in an editor that reveals hidden Unicode characters.
Learn more about bidirectional Unicode characters
| var category = Server.getConfigurationElementCategoryWithPath(inConfigurationElementPath); | |
| var elements = category.configurationElements; | |
| for each ( var element in elements) { | |
| if (element.name == inConfigurationElementName) { | |
| var configurationElement = element; | |
| } | |
| } | |
| configurationElement.setAttributeWithKey(inName, inValue); |
Workflow
If you don’t have one already, create a folder structure for Event Broker workflows. I have a folder for each lifecycle state, and for this, we will be using Building Machine:

Create a workflow called Update VM Name. Create an input called payload and of type Properties.
Create the following attributes, all of type String, except for attVCACEntity – which should be of type VCAC:Entity.
- attLockId
- attLockOwner
- attNewHostname
- attVCACEntity
- attVirtualMachineId
Set the value of attLockId to “namingLock” and attLockOwner to “eventBroker”:

On the Schema tab, drag a scriptable task across and call it getVirtualMachineId. Paste in the following code (substitute your sites accordingly):
This file contains bidirectional Unicode text that may be interpreted or compiled differently than what appears below. To review, open the file in an editor that reveals hidden Unicode characters.
Learn more about bidirectional Unicode characters
| // Retrieve the virtual machine properties | |
| var machine = payload.get("machine"); | |
| // Check the machine's properties exist | |
| if (machine !== null) { | |
| // Retrieve the values | |
| var attVirtualMachineId = machine.get("id"); | |
| } | |
| // Get the hostname generated by vRA | |
| var currentHostname = machine.get("name"); | |
| System.log("Assigned hostname is: " + currentHostname); | |
| // Retrieve the variables | |
| var machineProperties = machine.get("properties"); | |
| var datacenterLocation = machineProperties.get("Vrm.DataCenter.Location"); | |
| var location; | |
| switch(datacenterLocation) { | |
| case "Utrecht": | |
| location = "NL-UTC"; | |
| break; | |
| case "Southport": | |
| location = "GB-SRT"; | |
| break; | |
| } | |
| // Set the environment type | |
| var environment = System.getModule("com.hobbitcloud.misc").getConfigurationElement("_HobbitCloud/vRA","Environment","attName"); | |
| switch(environment) { | |
| case "Development": | |
| environment = "D"; | |
| break; | |
| case "Test": | |
| environment = "T"; | |
| break; | |
| case "Staging": | |
| environment = "S"; | |
| break; | |
| case "Production": | |
| environment = "P"; | |
| break; | |
| } | |
| // Get the workload type | |
| var workloadType = machineProperties.get("hc.workloadType"); | |
| // Create the lock to prevent concurrent execution | |
| LockingSystem.lockAndWait(attLockId, attLockOwner); | |
| // Get the current highest VM number | |
| var currentNum = System.getModule("com.hobbitcloud.misc").getConfigurationElement("_HobbitCloud/vRA/Naming",workloadType,"attNumber"); | |
| // Generate the next VM number | |
| var newNum = System.getModule("com.hobbitcloud.vra.naming").newNum(currentNum); | |
| // Write the new number back | |
| System.getModule("com.hobbitcloud.misc").setConfigurationElement("_HobbitCloud/vRA/Naming",workloadType,"attNumber",newNum); | |
| // Release the lock | |
| LockingSystem.unlock(attLockId, attLockOwner); | |
| // Construct new hostname | |
| var attNewHostname = location + "-" + environment + "-" + workloadType + "-" + newNum; | |
| // Return the new hostname | |
| System.log("The new hostname is: " + attNewHostname); |
The above code does the following:
- Retrieves the event broker payload and parses the properties
- Calculates the country and site
- Sets the environment (eg. development, production)
- Gets the workload type (eg. SQL or K8S)
- Retrieves the current version number, generates a new one and updates the configuration element
- Constructs the new hostname
Important: lines 52 and 58 reference the configuration elements actions we created earlier. Remember to replace these so they point to your actions.
Click on the Visual Binding tab and wire the inputs and attributes up as follows:

Next, drag an action onto the canvas and select the getVirtualMachineEntity we created earlier. Attach attributes as follows:

Finally, drag the renameVM action on:

This completes the vRealize Orchestrator work.
Configuring vRealize Automation
To make our script site-aware, we need to configure vRealize Automation accordingly. Whilst this won’t be necessary for everyone, it is handy to know should your environment grow.
Edit the file DataCenterLocations.xml, which can usually be found in C:\Program Files (x86)\VMware\vCAC\Server\Website\XmlData on all IaaS Web Manager hosts. In the following example I have listed both of my sites:
This file contains bidirectional Unicode text that may be interpreted or compiled differently than what appears below. To review, open the file in an editor that reveals hidden Unicode characters.
Learn more about bidirectional Unicode characters
| <?xml version="1.0" encoding="utf-8" ?> | |
| <CustomDataType> | |
| <Data Name="Utrecht" Description="Utrecht, NL"/> | |
| <Data Name="Southport" Description="Southport, UK"/> | |
| </CustomDataType> |
This needs to be the same on all Web Managers.
Next, edit each cluster resource and select the appropriate location:

Lastly, create a custom property called Vrm.DataCenter.Location:

Ensure the values in the drop-down box match the ones in DataCenterLocations.xml exactly.
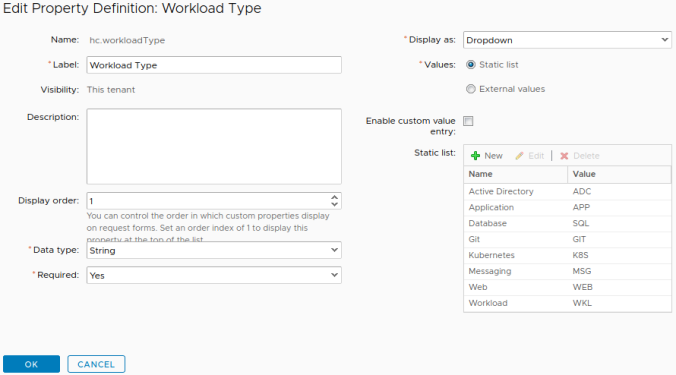
Create another custom property called prefix.WorkloadType, and in the drop-down box, enter values for the workload types you expect to deploy in your environment. I have listed a few that I use:
To trigger our Event Broker subscription (which will, in turn, fire our workflow) we need to create a list of the lifecycle states we wish to listen out for.
The easiest way to accomplish this is to create a property group and insert the required states:

Ensure that Extensibility.Lifecycle.Properties.VMPSMasterWorkflow32.BuildingMachine with a value of “__*,*” is captured so our workflow will fire at the appropriate time.
Event Broker
Create an Event Broker subscription called Update VM Name, and configure the conditions as follows:

On the next screen, select the workflow previously created.
Don’t forget to publish the subscription. I’ve lost count of the times that’s caught me out, especially in live demos!
Blueprint
For our naming policy to take effect, we need to add our previously created properties to our blueprints.
Edit the blueprint, and select your vSphere machine. Click on the Properties tab, and under Property Groups, click Add to select the Event Broker group.
Next, click the Custom Properties tab and add the prefix.workloadType property:

Here we have two options. We can either hard-code the value or keep it blank and check the Show in Request box.
For workload-specific blueprints where I know ahead of time what I’ll be deploying (such as a Kubernetes cluster running on NSX-T), I tend to hard-code the value. For generic deployments like a simple Windows Server 2019 single-machine blueprint, I would typically allow the requester to make the choice at runtime.
Finishing off
Whilst this solution provides you with a naming policy for vRealize Automation without the use of third-party tools or systems, it would need to be adapted to work with vRA 8.x or vRA Cloud. A solution which could work with both would be an idea for the future.
I’d like to thank Michael Poore for helping with the locking issue. Multi-machine blueprints deploying in quick succession were receiving the same machine name until he cast his eye over it.

Pingback: Newsletter: May 23, 2020 – Notes from MWhite
Hi Mark,
Great article. I have found this really helpful.
Could of questions please if you dont mind?
On the actions renameVM and newNum, is there a return type?
I already have a custom property assigned for datacenter locations that match the compute resource names that a user can select. Do I still need that section in the workflow or should I just mirror it?
My hostname convention is similar to your I have :
Site | Type | Location | Function | Number
## | S or A | ### | ### | 001
Each team has their own function to select, the other contructs have been made from custom properties that are assigned to compute resources.
Each team has multiple options for function, that is the section of the hostname I am trying to change, I can create a dynamic dropdown for the choice using an action. I was just wondering if you had any thoughts, I hadnt thought about using config elements.
Thanks again for the article.
Regards
Dean
LikeLike
Hey Dean,
Yes, the return type on renameVM is “Any” and on newNum it is “String”.
Thanks for the heads-up – I’ve updated the post.
What you’ve suggested (dropdown for the function) sounds good. That’s in effect what I do for the workload – I either hard code it on the blueprint or let the user select it in a dropdown at runtime.
-Mark
LikeLike