 In part 2 we outlined our storage resources for the project. We built a Windows 2012 R2 Server which provided iSCSI and NFS services to the environment.
In this part we configure the networking infrastructure that has been provided for the lab, and prepare it for the introduction of our VMware ESXi hosts.
Other posts in this series
- Intro
- Physical infrastructure – storage
- Physical infrastructure – networking
- Physical infrastructure – compute
- Authentication services
- Deploy and configure the vCenter Server Appliance
- Configure vCenter Server Appliance SSL certificates
- Deploy and configure the vRA Appliance
- Deploy and configure the IaaS platform
- Configure tenants
- Configure endpoint & fabric/business groups
- Configure blueprints (coming soon)
- Configure entitlements (coming soon)
- Configure policies (coming soon)
- Integration with vCloud Air (coming soon)
- Tidy up (coming soon)
Connection to the outside World
For this project it has been decided that the lab will have its own connection to the corporate firewall in a segregated part of the network. For obvious reasons I won’t go into specifics (make/model etc), other than to say that DNS, NTP, and HTTP/HTTPS have been allowed out, but at this point nothing in. Obviously that may need to change at a later time when we configure vRA to use various cloud providers as our endpoints.
Storage networking
For storage, we have implemented a Netgear ProSAFE 8-port 10 Gigabit Plus Switch (XS708E). This is an unmanaged 10GbE switch designed for small companies. Whilst it is not typical of the storage hardware we implement for our enterprise customers, it does allow us to provision reasonably fast storage to the lab at a lower cost.
As the switch is unmanaged there is little to configure. All iSCSI storage zoning is done at the target , as shown in the previous post.
One regrettable side effect of using an unmanaged switch is the inability to enable jumbo frames, so this will not be set on either the storage server or ESXi hosts.
Together with this, we only have one switch to handle all our 10Gbe storage networking needs, creating an obvious single point of failure. As a second switch was not available we looked into purchasing one. However due to the cost this would have violated one of the function requirements – keep costs low. This has been recorded as a risk to the project.
LAN networking
For general (non-storage traffic), we have provisioned two Cisco WS-C2960S-48TS-L switches that were left over from a previous project. These have been provided with a blank config, and must be configured before they can be used.
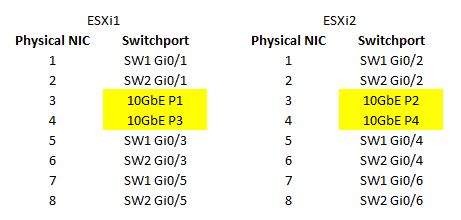
I have connected the ESXi hosts as follows:
Connect a Cisco console cable from a workstation/laptop to the switch and open PuTTY. Power the switch on:

It asks if you would like to enter the initial configuration dialog. Type no.
Enter admin mode:
en
Enter configuration mode:
conf t
Set the enable secret (substitute accordingly):
enable secret VMware1!
Create a user account:
username ciscoadmin privilege 15 password VMware1!
Set passwords to show as encrypted in the config:
service password-encryption
Set the hostname:
hostname switch1
Set the domain name:
ip domain-name lab.mdb-lab.com
no ip domain-lookup
Configure VLAN1
int vlan1
no ip address
shutdown
Set the switch IP address. In the lab, VLAN10 will be the management network:
int vlan10
desc Management
ip address 192.168.146.211 255.255.255.0
ip default-gateway 192.168.146.253
Create the remaining VLANs (again, substitute accordingly):
vtp mode transparent
vlan 20
name vMotion
vlan 30
name FT
vlan 40
name NFS
vlan 150
name Operations
vlan 160
name Technical_Specialists
vlan 170
name Development
Configure the ESXi ports:
int range Gi0/1 - 6
speed 1000
duplex full
switchport mode trunk
switchport trunk allowed vlan 10-40,150-170
Configure each port description:
int Gi0/1
desc ESXi1 NIC1
int Gi0/2
desc ESXi2 NIC1
int Gi0/3
desc ESXi1 NIC5
int Gi0/4
desc ESXi2 NIC5
int Gi0/5
desc ESXi1 NIC7
int Gi0/6
desc ESXi2 NIC7
Ports 47 and 48 are patched directly into ports 47 and 48 on switch2.
Configure a port channel for connection to switch2:
interface Port-channel1
description INTER-SWITCH-LINK
switchport mode trunk
Configure each port:
int range Gi0/27-48
desc INTER-SWITCH-LINK
speed 1000
duplex full
switchport mode trunk
switchport trunk allowed vlan 10-40,150-170
channel-group 1 mode on
Configure NTP:
ntp server 192.168.146.204
Disable HTTP server
no ip http server
I have chosen not to enable SSH as the lab will not need it. I have also chosen to omit some other ports such as the firewall connections etc.
The config for switch2 is the same, albeit with minor alterations to port settings etc. These will need to be modified when copying across.
Coming up
In this part we configured the networking switches for our lab environment. In part 4 we install and configure our two ESXi hosts.
