 In part 7 we configured our F5 devices to load-balance traffic to the VMware View Connection Servers.
In the final part of this series we deploy a View Access Point in the DMZ to provide access to desktop and published applications to remote users.
Other posts in this series:
- Design
- Installing the Connection Servers and Composer
- Creating the templates
- Configuring the RDS hosts
- Pool configuration
- Application farm configuration
- Load-balancing
- Remote access
The design specifies that virtual desktops must be available to remote users without having to use a VPN (see part 1, Requirements, R2). To provide this, we will install and configure a VMware View Access Point in the DMZ.
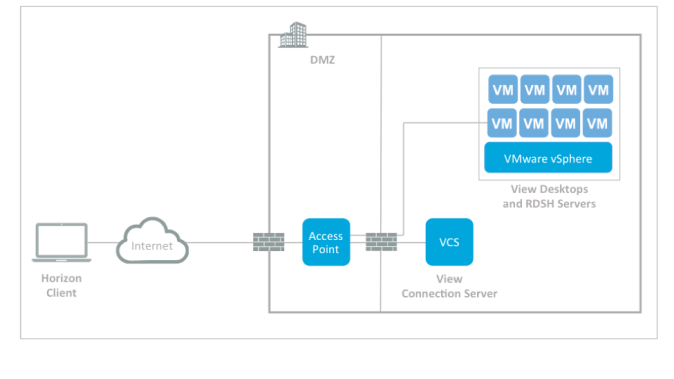
Image courtesy of VMware
VMware introduced the Access Point in Horizon View 6.2. It is a hardened SUSE Linux appliance that can (in most cases) replace a View Security Server running on Windows.
Access Point is primarily designed to allow secure remote access to VMware end-user-computing resources from authorized users connecting from the Internet.
Design
The design dictates that a single Access Point will be deployed:
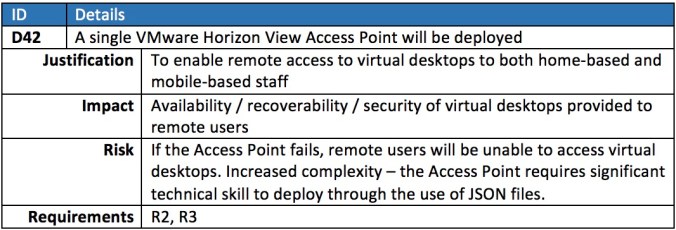
However this creates a single point of failure and as such violates one of the requirements (R2). A more preferred solution would be:
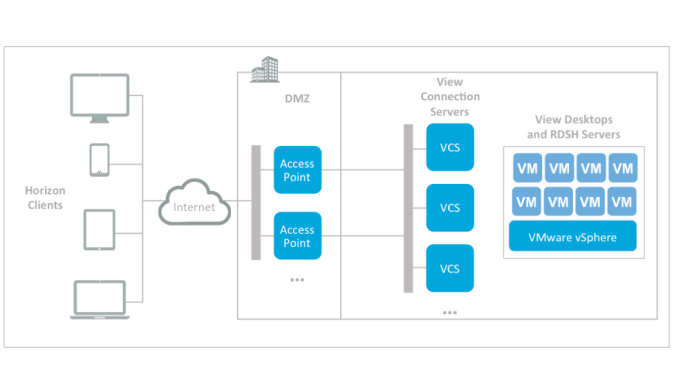
Image courtesy of VMware
Unfortunately, the design is constrained by budget (part 1, Constraints, C4), so whilst deploying multiple Access Points would not increase costs, to make use of them would require an additional load-balancer. Therefore this single point of failure must be flagged as a risk and recorded.
The Access Point will be placed in the DMZ network. The design assumes this is in place and has been secured accordingly (part 1, Assumptions, A5).
The Access Point will connect to the view3 connection server:
To enhance security, the following design decision has also been made:
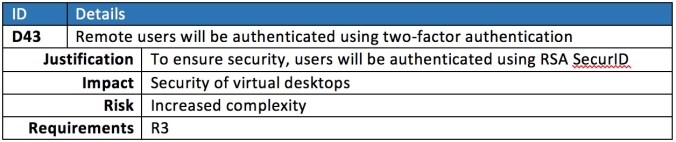
However only remote users must be forced to authenticate using RSA SecurID. Users accessing the View Connection Servers from the LAN must be granted access using just their Active Directory credentials:
Getting started
The Access Point will be deployed with the following IP details (substitute accordingly):
- IP: 10.10.10.4
- Subnet mask: 255.255.255.0
- Default gateway: 10.10.10.254
To enable communication between the Access Point and view3, the following traffic must be allowed through the firewall:

The following must also be allowed between the Access Point and the subnet containing the virtual desktops:
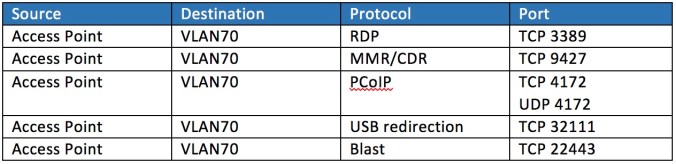
Additionally, the following traffic must be allowed through to the subnet containing the RDSH servers (VLAN60 in our example):

Additionally, a number of components need to talk back to the Access Point:
![]()

To better illustrate the traffic flow:
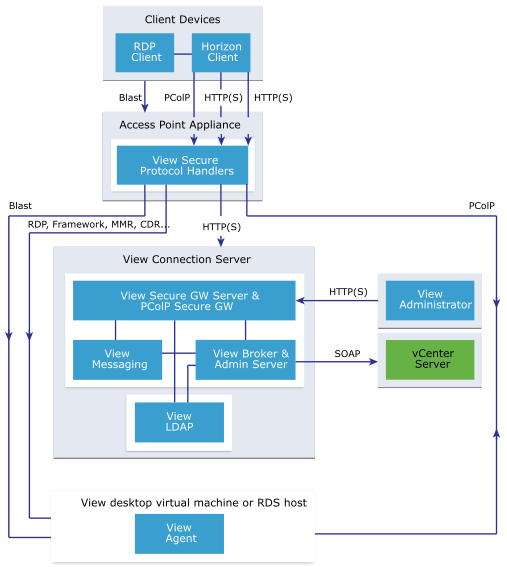
Image courtesy of VMware
Network profile
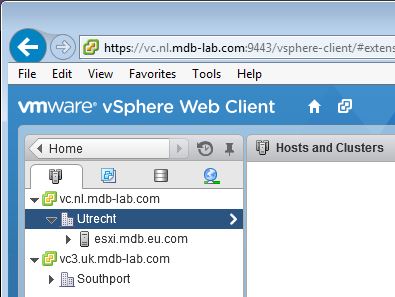
Before the Access Point can be deployed a network profile needs to be created on the vCenter.
Logon to the vSphere Web Client and click Hosts and Clusters:
Click the Datacentre you plan to deploy the Access Point to and then click the Manage tab. Then click Network Protocol Profiles:
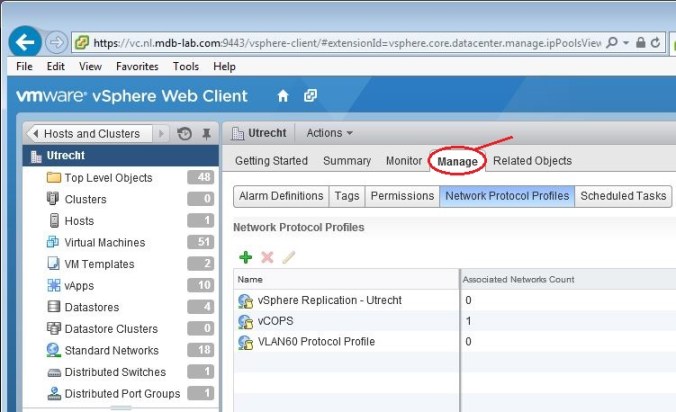
Click the green plus icon:
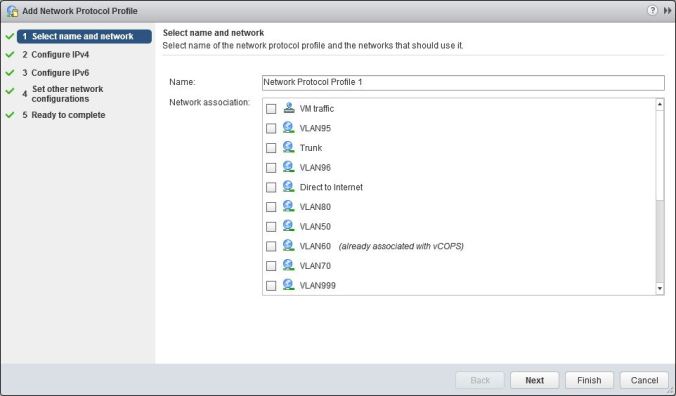
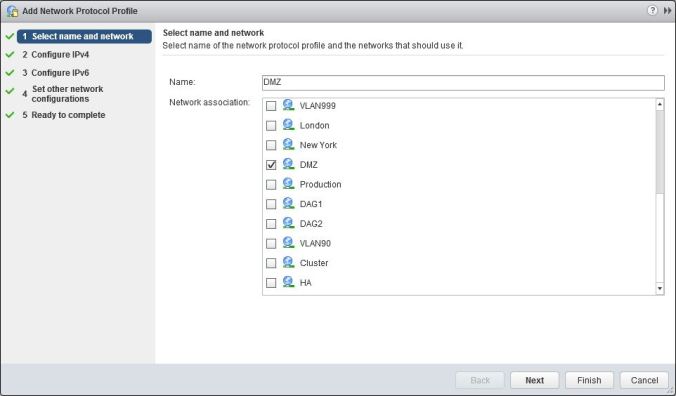
Type a name for the profile in the Name field, then select the DMZ network you plan to use:
Click Next
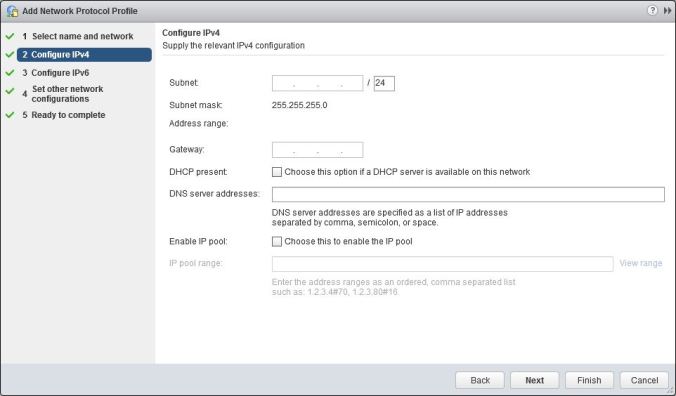
Type in the subnet address, gateway and DNS server addresses:
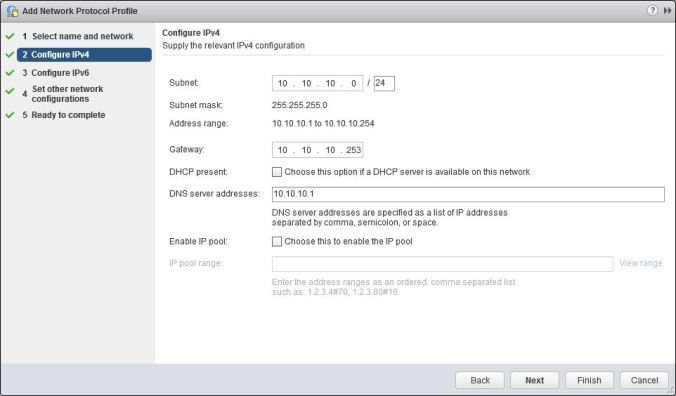
Click Finish.
Thumbprint
Use a web browser to browse to https://view3.nl.mdb-lab.com (substitute accordingly).
Access the certificate properties and find the thumbprint:
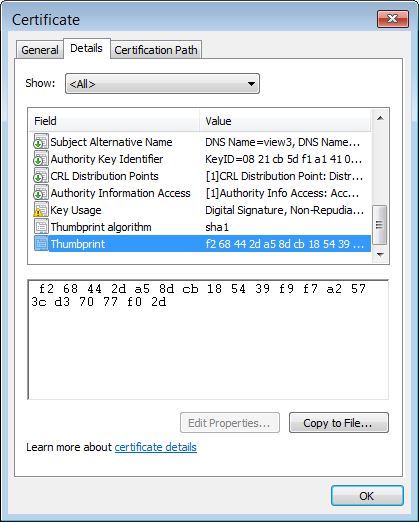
In the example above it is:
f2 68 44 2d a5 8d cb 18 54 39 f9 f7 a2 57 3c d3 70 77 f0 2d
SSL certificate
As our Access Point will be web-facing we will need to use a genuine SSL certificate from a recognised certificate authority.
Create the following file and save it as vdi.cfg (substitute the highlighted lines accordingly):
[ req ]
default_bits = 2048
distinguished_name = req_distinguished_name
encrypt_key = no
prompt = no
string_mask = nombstr
req_extensions = v3_req

[ v3_req ]
basicConstraints = CA:false
keyUsage = digitalSignature, keyEncipherment, dataEncipherment
extendedKeyUsage = serverAuth, clientAuth

[ req_distinguished_name ]
commonName = vdi.mdb-lab.com
Create a certificate signing request:
openssl req -new -nodes -out vdi.csr -keyout vdi.key -config vdi.cfg
Submit the CSR to the certificate authority to generate the certificate. Download the certificate along with the certificate chain.
Create a PEM file (on Windows) using the following:
type vdi.crt intermediate.crt root.crt > chain.pem
On Linux / Mac use:
cat vdi.crt intermediate.crt root.crt > chain.pem
The PEM file will be in the following format:
—–BEGIN CERTIFICATE—–
Your VDI Certificate
—–END CERTIFICATE—–
—–BEGIN CERTIFICATE—–
Intermediate Certificate
—–END CERTIFICATE—–
—–BEGIN CERTIFICATE—–
Root Certificate
—–END CERTIFICATE—–
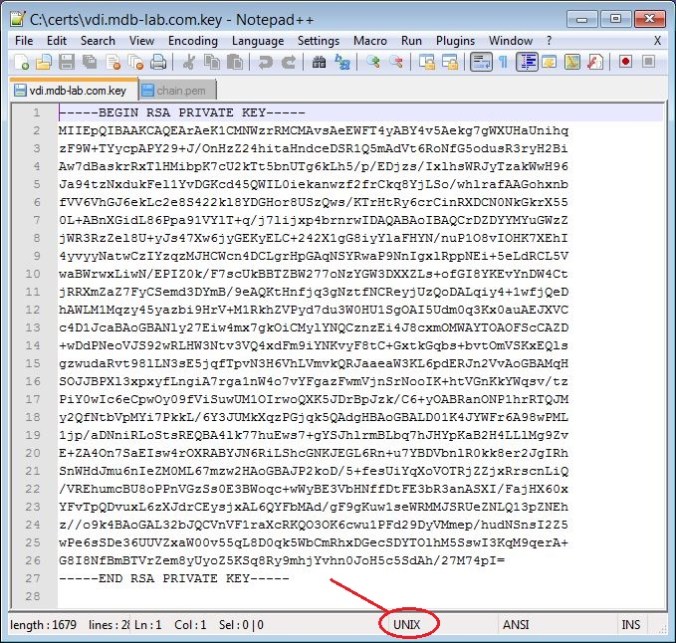
We also need the private key from above, which should be in the following format:
—–BEGIN RSA PRIVATE KEY—–
Your private key
—–END RSA PRIVATE KEY—–
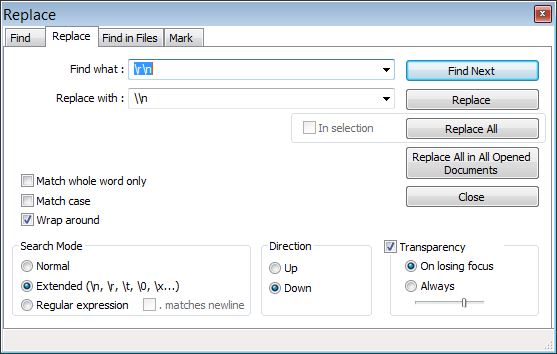
Both files need to be converted from multi-line to single-line. On Windows, open each file in Notepad++:
If the file is in Unix mode (as identified on the status bar at the bottom), highlight the entire text and use the Replace function (Search menu):

In the Find field type \n, and in the Replace with field type \\n. Check the Extended radio button:
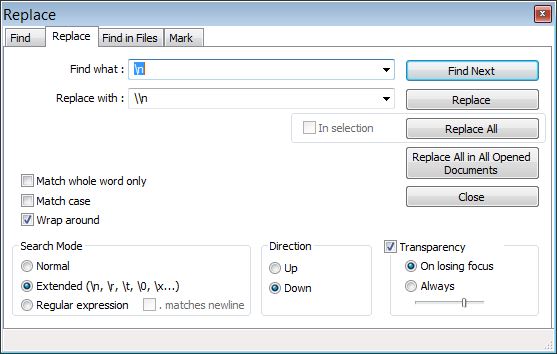
Click Replace All.
If the file is in DOS mode, replace \r\n with \\n:
You should now have two PEM files each in a single line.
View Connection Server configuration
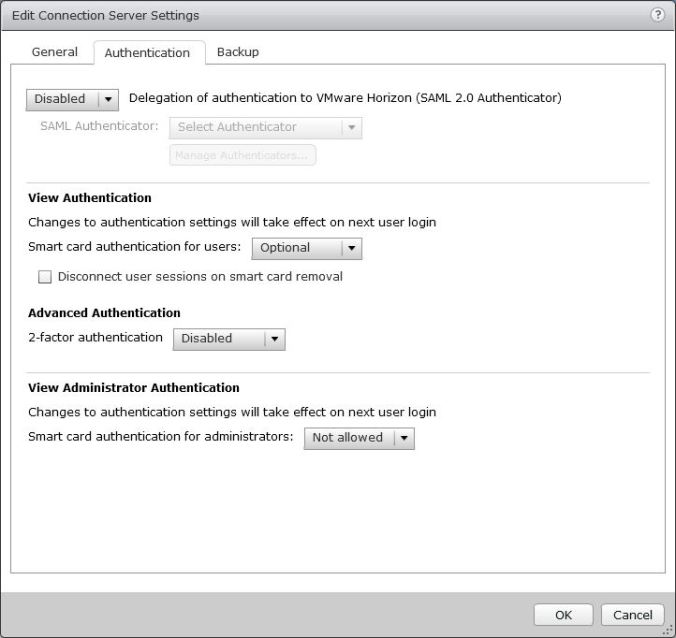
Logon to the View Administrator page. On the left-hand side, expand View Configuration and click Servers:
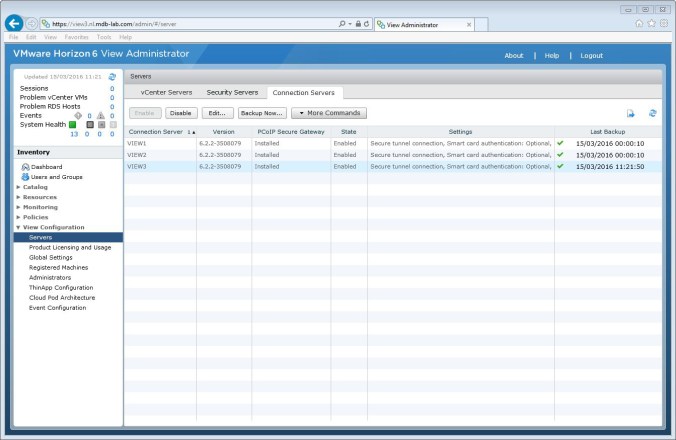
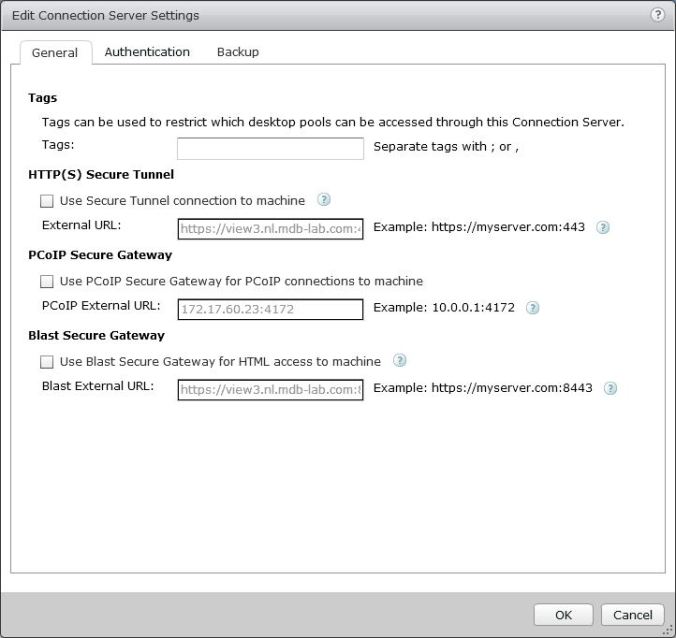
Select VIEW3 and the click Edit…
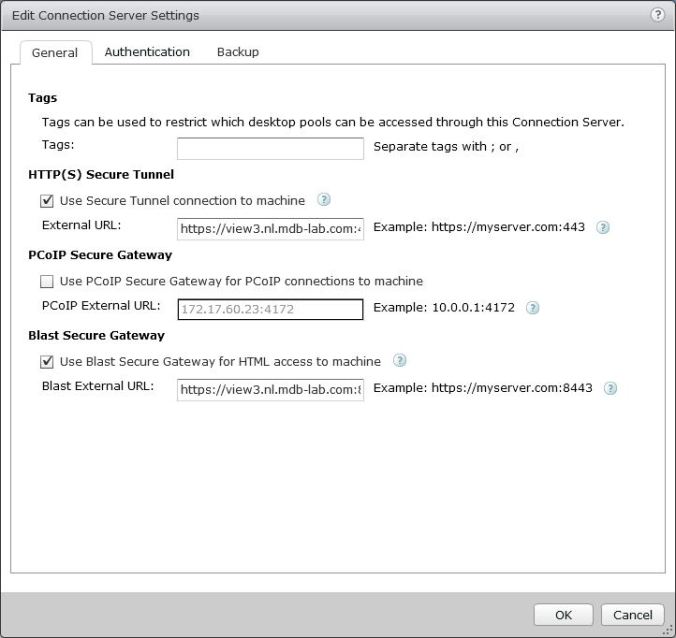
Uncheck HTTP(S) Secure Tunnel and Blast Secure Gateway:
Click the Authentication tab:
Under Advanced Authentication, select RSA SecurID from the 2-factor authentication drop-down box. Upload your sdconf.rec file:
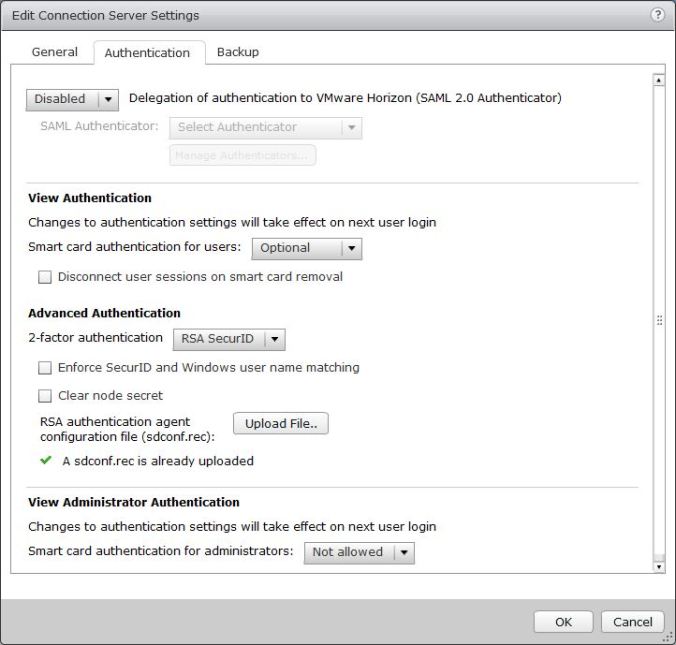
Click OK.
Access Point
To deploy the Access Point we will use the ovftool, which you can download from https://my.vmware.com/group/vmware/details?downloadGroup=OVFTOOL400&productId=353.
Using ovftool, initiate the deployment with the following parameters (substitute accordingly):
ovftool --machineOutput --X:enableHiddenProperties \
--X:logToConsole \
--X:logLevel=info \
--powerOffTarget \
--noSSLVerify \
--powerOn \
--overwrite \
--vmFolder="" \
--net:Internet="DMZ" \
--net:ManagementNetwork="DMZ" \
--net:BackendNetwork="DMZ" \
-ds="SSD_R1" \
-dm=Thin \
--name="vdi.mdb-lab.com" \
--ipAllocationPolicy=fixedPolicy \
--deploymentOption=onenic \
--prop:ip0=10.10.10.4 \
--prop:DNS="10.10.10.1" \
--prop:adminPassword="VMware1!" \
--prop:rootPassword="VMware1!" \
--prop:settingsJSON="{\"edgeServiceSettingsList\": { \"edgeServiceSettingsList\":[ { \"identifier\": \"VIEW\", \"enabled\": true,\"proxyDestinationUrl\":\"https://view3.nl.mdb-lab.com:443\",\"proxyDestinationUrlThumbprints\":\"sha1=f2 68 44 2d a5 8d cb 18 54 39 f9 f7 a2 57 3c d3 70 77 f0 2d\",\"tunnelEnabled\":true,\"tunnelExternalUrl\":\"vdi.mdb-lab.com:443\",\"pcoipEnabled\":true,\"pcoipExternalUrl\":\"31.160.49.220:4172\",\"blastEnabled\":true,\"blastExternalUrl\":\"vdi.mdb-lab.com:8443\",\"proxyPattern\":\"/\" }]},\"certificateWrapper\":{\"privateKeyPem\":\"\\n-----BEGIN RSA PRIVATE KEY-----\\nMIIEpQIBAAKCAQEArAeK1CMNWzrRMCMAvsAeEWFT4yABY4v5Aekg7gWXUHaUnihq\\nzF9W+TYycpAPY29+J/OnHzZ24hitaHndceDSR1Q5mAdVt6RoNfG5odusR3ryH2Bi\\nAw7dBaskrRxTlHMibpK7cU2kTt5bnUTg6kLh5/p/EDjzs/IxlhsWRJyTzakWwH96\\nJa94tzNxdukFel1YvDGKcd45QWIL0iekanwzf2frCkq8YjLSo/whlrafAAGohxnb\\nfVV6VhGJ6ekLc2e8S422kl8YDGHor8USzQws/KTrHtRy6crCinRXDCN0NkGkrX55\\n0L+ABnXGidL86Ppa91VYlT+q/j7lijxp4brnrwIDAQABAoIBAQCrDZDYYMYuGWzZ\\njWR3RzZel8U+yJs47Xw6jyGEKyELC+242X1gG8iyYlaFHYN/nuP1O8vIOHK7XEhI\\n4yvyyNatwCzIYzqzMJHCWcn4DCLgrHpGAqNSYRwaP9NnIgxlRppNEi+5eLdRCL5V\\nwaBWrwxLiwN/EPIZ0k/F7scUkBBTZBW277oNzYGW3DXXZLs+ofGI8YKEvYnDW4Ct\\njRRXmZaZ7FyCSemd3DYmB/9eAQKtHnfjq3gNztfNCReyjUzQoDALqiy4+1wfjQeD\\nhAWLM1Mqzy45yazbi9HrV+M1RkhZVPyd7du3W0HU1SgOAI5Udm0q3Kx0auAEJXVC\\nc4D1JcaBAoGBANly27Eiw4mx7gkOiCMylYNQCznzEi4J8cxmOMWAYTOAOFScCAZD\\n+wDdPNeoVJS92wRLHW3Ntv3VQ4xdFm9iYNKvyF8tC+GxtkGqbs+bvtOmVSKxEQls\\ngzwudaRvt98lLN3sE5jqfTpvN3H6VhLVmvkQRJaaeaW3KL6pdERJn2VvAoGBAMqH\\nSOJJBPXl3xpxyfLngiA7rga1nW4o7vYFgazFwmVjnSrNooIK+htVGnKkYWqsv/tz\\nPiY0wIc6eCpwOy09fViSuwUM1OIrwoQXK5JDrBpJzk/C6+yOABRanONP1hrRTQJM\\ny2QfNtbVpMYi7PkkL/6Y3JUMkXqzPGjqk5QAdgHBAoGBALD01K4JYWFr6A98wPML\\n1jp/aDNniRLoStsREQBA4lk77huEws7+gYSJhlrmBLbq7hJHYpKaB2H4LLlMg9Zv\\nE+ZA4On7SaEIsw4rOXRABYJN6RiLShcGNKJEGL6Rn+u7YBDVbnlR0kk8er2JgIRh\\nSnWHdJmu6nIeZM0ML67mzw2HAoGBAJP2koD/5+fesUiYqXoVOTRjZZjxRrscnLiQ\\n/VREhumcBU8oPPnVGzSs0E3BWoqc+wWyBE3VbHNffDtFE3bR3anASXI/FajHX60x\\nYFvTpQDvuxL6zXJdrCEysjxAL6QYFbMAd/gF9gKuw1seWRMMJSRUeZNLQ13pZNEh\\nz//o9k4BAoGAL32bJQCVnVF1raXcRKQO3OK6cwu1PFd29DyVMmep/hudNSnsI2Z5\\nwPe6sSDe36UUVZxaW00v55qL8D0qk5WbCmRhxDGecSDYTOlhM5SswI3KqM9qerA+\\nG8I8NfBmBTVrZem8yUyoZ5KSq8Ry9mhjYvhn0JoH5c5SdAh/27M74pI=\\n-----END RSA PRIVATE KEY-----\\n\",\"certChainPem\":\"\\n-----BEGIN CERTIFICATE-----\\nMIIFUDCCBDigAwIBAgIQDmRezWSmnvhXNe6P5YrjHTANBgkqhkiG9w0BAQsFADBw\\nMQswCQYDVQQGEwJVUzEVMBMGA1UEChMMRGlnaUNlcnQgSW5jMRkwFwYDVQQLExB3\\nd3cuZGlnaWNlcnQuY29tMS8wLQYDVQQDEyZEaWdpQ2VydCBTSEEyIEhpZ2ggQXNz\\ndXJhbmNlIFNlcnZlciBDQTAeFw0xNjAzMTQwMDAwMDBaFw0xNjA0MjExMjAwMDBa\\nMGwxCzAJBgNVBAYTAkdCMRgwFgYDVQQIEw9CdWNraW5naGFtc2hpcmUxDzANBgNV\\nBAcTBk1hcmxvdzEYMBYGA1UEChMPTWFyayBCcm9va2ZpZWxkMRgwFgYDVQQDEw92\\nZGkubWRiLWxhYi5jb20wggEiMA0GCSqGSIb3DQEBAQUAA4IBDwAwggEKAoIBAQCs\\nB4rUIw1bOtEwIwC+wB4RYVPjIAFji/kB6SDuBZdQdpSeKGrMX1b5NjJykA9jb34n\\n86cfNnbiGK1oed1x4NJHVDmYB1W3pGg18bmh26xHevIfYGIDDt0FqyStHFOUcyJu\\nkrtxTaRO3ludRODqQuHn+n8QOPOz8jGWGxZEnJPNqRbAf3olr3i3M3F26QV6XVi8\\nMYpx3jlBYgvSJ6RqfDN/Z+sKSrxiMtKj/CGWtp8AAaiHGdt9VXpWEYnp6QtzZ7xL\\njbaSXxgMYeivxRLNDCz8pOse1HLpysKKdFcMI3Q2QaStfnnQv4AGdcaJ0vzo+lr3\\nVViVP6r+PuWKPGnhuuevAgMBAAGjggHoMIIB5DAfBgNVHSMEGDAWgBRRaP+QrwIH\\ndTzM2WVkYqISuFlyOzAdBgNVHQ4EFgQUF4c8lJVD7hFMlMBIG/ZQi1KH1XUwGgYD\\nVR0RBBMwEYIPdmRpLm1kYi1sYWIuY29tMA4GA1UdDwEB/wQEAwIFoDAdBgNVHSUE\\nFjAUBggrBgEFBQcDAQYIKwYBBQUHAwIwdQYDVR0fBG4wbDA0oDKgMIYuaHR0cDov\\nL2NybDMuZGlnaWNlcnQuY29tL3NoYTItaGEtc2VydmVyLWc1LmNybDA0oDKgMIYu\\naHR0cDovL2NybDQuZGlnaWNlcnQuY29tL3NoYTItaGEtc2VydmVyLWc1LmNybDBM\\nBgNVHSAERTBDMDcGCWCGSAGG/WwBATAqMCgGCCsGAQUFBwIBFhxodHRwczovL3d3\\ndy5kaWdpY2VydC5jb20vQ1BTMAgGBmeBDAECAzCBgwYIKwYBBQUHAQEEdzB1MCQG\\nCCsGAQUFBzABhhhodHRwOi8vb2NzcC5kaWdpY2VydC5jb20wTQYIKwYBBQUHMAKG\\nQWh0dHA6Ly9jYWNlcnRzLmRpZ2ljZXJ0LmNvbS9EaWdpQ2VydFNIQTJIaWdoQXNz\\ndXJhbmNlU2VydmVyQ0EuY3J0MAwGA1UdEwEB/wQCMAAwDQYJKoZIhvcNAQELBQAD\\nggEBAK/nz7VE0/TwguNg6Cn3x6zCaz7FO8CF+3ckpxLt+D8pRYFz+PvDjxYebyku\\n2KWJ3tk07I95Zuv5ybPT5pNJpmRFbO0j19M3N4TdVmxGUTX3xylEhZW0Dw2yGPQk\\nlekdzROuBT0tKbHmj3xd2RMbeh/PsOxs+8FVWI/iovJUyQ17ySXw/j0whhtWMEL2\\nHqgf9fMxGo0Rkh056p9ze9cewu24C/edrwbcTyScQ1W5qgkNCu/bmHlkVMzcNvHw\\nOpNzdDebrgj22yBOMpovR8BfhS7g1MGhYOpoSX7Puq/3Xq7AynEPCRLYdJF9fFHt\\nC8k6+O1FJujLlaQZw0kGoVnt5wE=\\n-----END CERTIFICATE-----\\n-----BEGIN CERTIFICATE-----\\nMIIEsTCCA5mgAwIBAgIQBOHnpNxc8vNtwCtCuF0VnzANBgkqhkiG9w0BAQsFADBs\\nMQswCQYDVQQGEwJVUzEVMBMGA1UEChMMRGlnaUNlcnQgSW5jMRkwFwYDVQQLExB3\\nd3cuZGlnaWNlcnQuY29tMSswKQYDVQQDEyJEaWdpQ2VydCBIaWdoIEFzc3VyYW5j\\nZSBFViBSb290IENBMB4XDTEzMTAyMjEyMDAwMFoXDTI4MTAyMjEyMDAwMFowcDEL\\nMAkGA1UEBhMCVVMxFTATBgNVBAoTDERpZ2lDZXJ0IEluYzEZMBcGA1UECxMQd3d3\\nLmRpZ2ljZXJ0LmNvbTEvMC0GA1UEAxMmRGlnaUNlcnQgU0hBMiBIaWdoIEFzc3Vy\\nYW5jZSBTZXJ2ZXIgQ0EwggEiMA0GCSqGSIb3DQEBAQUAA4IBDwAwggEKAoIBAQC2\\n4C/CJAbIbQRf1+8KZAayfSImZRauQkCbztyfn3YHPsMwVYcZuU+UDlqUH1VWtMIC\\nKq/QmO4LQNfE0DtyyBSe75CxEamu0si4QzrZCwvV1ZX1QK/IHe1NnF9Xt4ZQaJn1\\nitrSxwUfqJfJ3KSxgoQtxq2lnMcZgqaFD15EWCo3j/018QsIJzJa9buLnqS9UdAn\\n4t07QjOjBSjEuyjMmqwrIw14xnvmXnG3Sj4I+4G3FhahnSMSTeXXkgisdaScus0X\\nsh5ENWV/UyU50RwKmmMbGZJ0aAo3wsJSSMs5WqK24V3B3aAguCGikyZvFEohQcft\\nbZvySC/zA/WiaJJTL17jAgMBAAGjggFJMIIBRTASBgNVHRMBAf8ECDAGAQH/AgEA\\nMA4GA1UdDwEB/wQEAwIBhjAdBgNVHSUEFjAUBggrBgEFBQcDAQYIKwYBBQUHAwIw\\nNAYIKwYBBQUHAQEEKDAmMCQGCCsGAQUFBzABhhhodHRwOi8vb2NzcC5kaWdpY2Vy\\ndC5jb20wSwYDVR0fBEQwQjBAoD6gPIY6aHR0cDovL2NybDQuZGlnaWNlcnQuY29t\\nL0RpZ2lDZXJ0SGlnaEFzc3VyYW5jZUVWUm9vdENBLmNybDA9BgNVHSAENjA0MDIG\\nBFUdIAAwKjAoBggrBgEFBQcCARYcaHR0cHM6Ly93d3cuZGlnaWNlcnQuY29tL0NQ\\nUzAdBgNVHQ4EFgQUUWj/kK8CB3U8zNllZGKiErhZcjswHwYDVR0jBBgwFoAUsT7D\\naQP4v0cB1JgmGggC72NkK8MwDQYJKoZIhvcNAQELBQADggEBABiKlYkD5m3fXPwd\\naOpKj4PWUS+Na0QWnqxj9dJubISZi6qBcYRb7TROsLd5kinMLYBq8I4g4Xmk/gNH\\nE+r1hspZcX30BJZr01lYPf7TMSVcGDiEo+afgv2MW5gxTs14nhr9hctJqvIni5ly\\n/D6q1UEL2tU2ob8cbkdJf17ZSHwD2f2LSaCYJkJA69aSEaRkCldUxPUd1gJea6zu\\nxICaEnL6VpPX/78whQYwvwt/Tv9XBZ0k7YXDK/umdaisLRbvfXknsuvCnQsH6qqF\\n0wGjIChBWUMo0oHjqvbsezt3tkBigAVBRQHvFwY+3sAzm2fTYS5yh+Rp/BIAV0Ae\\ncPUeybQ=\\n-----END CERTIFICATE-----\\n-----BEGIN CERTIFICATE-----\\nMIIDxTCCAq2gAwIBAgIQAqxcJmoLQJuPC3nyrkYldzANBgkqhkiG9w0BAQUFADBs\\nMQswCQYDVQQGEwJVUzEVMBMGA1UEChMMRGlnaUNlcnQgSW5jMRkwFwYDVQQLExB3\\nd3cuZGlnaWNlcnQuY29tMSswKQYDVQQDEyJEaWdpQ2VydCBIaWdoIEFzc3VyYW5j\\nZSBFViBSb290IENBMB4XDTA2MTExMDAwMDAwMFoXDTMxMTExMDAwMDAwMFowbDEL\\nMAkGA1UEBhMCVVMxFTATBgNVBAoTDERpZ2lDZXJ0IEluYzEZMBcGA1UECxMQd3d3\\nLmRpZ2ljZXJ0LmNvbTErMCkGA1UEAxMiRGlnaUNlcnQgSGlnaCBBc3N1cmFuY2Ug\\nRVYgUm9vdCBDQTCCASIwDQYJKoZIhvcNAQEBBQADggEPADCCAQoCggEBAMbM5XPm\\n+9S75S0tMqbf5YE/yc0lSbZxKsPVlDRnogocsF9ppkCxxLeyj9CYpKlBWTrT3JTW\\nPNt0OKRKzE0lgvdKpVMSOO7zSW1xkX5jtqumX8OkhPhPYlG++MXs2ziS4wblCJEM\\nxChBVfvLWokVfnHoNb9Ncgk9vjo4UFt3MRuNs8ckRZqnrG0AFFoEt7oT61EKmEFB\\nIk5lYYeBQVCmeVyJ3hlKV9Uu5l0cUyx+mM0aBhakaHPQNAQTXKFx01p8VdteZOE3\\nhzBWBOURtCmAEvF5OYiiAhF8J2a3iLd48soKqDirCmTCv2ZdlYTBoSUeh10aUAsg\\nEsxBu24LUTi4S8sCAwEAAaNjMGEwDgYDVR0PAQH/BAQDAgGGMA8GA1UdEwEB/wQF\\nMAMBAf8wHQYDVR0OBBYEFLE+w2kD+L9HAdSYJhoIAu9jZCvDMB8GA1UdIwQYMBaA\\nFLE+w2kD+L9HAdSYJhoIAu9jZCvDMA0GCSqGSIb3DQEBBQUAA4IBAQAcGgaX3Nec\\nnzyIZgYIVyHbIUf4KmeqvxgydkAQV8GK83rZEWWONfqe/EW1ntlMMUu4kehDLI6z\\neM7b41N5cdblIZQB2lWHmiRk9opmzN6cN82oNLFpmyPInngiK3BD41VHMWEZ71jF\\nhS9OMPagMRYjyOfiZRYzy78aG6A9+MpeizGLYAiJLQwGXFK3xPkKmNEVX58Svnw2\\nYzi9RKR/5CYrCsSXaQ3pjOLAEFe4yHYSkVXySGnYvCoCWw9E1CAx2/S6cCZdkGCe\\nvEsXCS+0yx5DaMkHJ8HSXPfqIbloEpw8nL+e/IBcm2PN7EeqJSdnoDfzAIJ9VNep\\n+OkuE6N36B9K\\n-----END CERTIFICATE-----\\n\\n\"}}" \
"C:\Users\mark\Dropbox\Software\VMware\View\6.2\euc-access-point-2.0.2.0-3588614_OVF10.ova" \
vi://"vi_admin@nl.mdb-lab.com":VMware1!@vc.nl.mdb-lab.com/"Utrecht"/host/esxi.mdb.eu.com
Breaking it down:
--machineOutput --X:enableHiddenProperties \
--X:logToConsole \
--X:logLevel=info \
--powerOffTarget \
--noSSLVerify \
--powerOn \
--overwrite \
--vmFolder="" \
--net:Internet="DMZ" \
--net:ManagementNetwork="DMZ" \
--net:BackendNetwork="DMZ" \
-ds="SSD_R1" \
-dm=Thin \
- Line 8: This tells ovftool to place the virtual machine in the root of the folder hierarchy
- Line 9: The Internet interface is mandatory, whereas Management and Backend are not
- Line 12: This defines which datastore is used
- Line 13: This sets the type of disk provision (thin, thick, eager-thick)
--name="vdi.mdb-lab.com" \
--ipAllocationPolicy=fixedPolicy \
--deploymentOption=onenic \
--prop:ip0=10.10.10.4 \
--prop:DNS="10.10.10.1" \
--prop:adminPassword="VMware1!" \
--prop:rootPassword="VMware1!" \
- Line 14: The name of the virtual machine
- Line 16:The number of NICs used
The next line is the JSON file which to function correctly needs to be formatted onto one line. This file includes:
- Target destination View Connection Server (in our case view3)
- Thumbprint of connection server
- External, PCoIP and Blast URLs (with port numbers)
- SSL certificate private key
- SSL certificate chain (certificate, intermediate CA and root CA)
Testing
To test the deployment, open the VMware View Client on a device that is external to the network and connect to the published URL: Enter your RSA SecurID PIN and token and click Login:
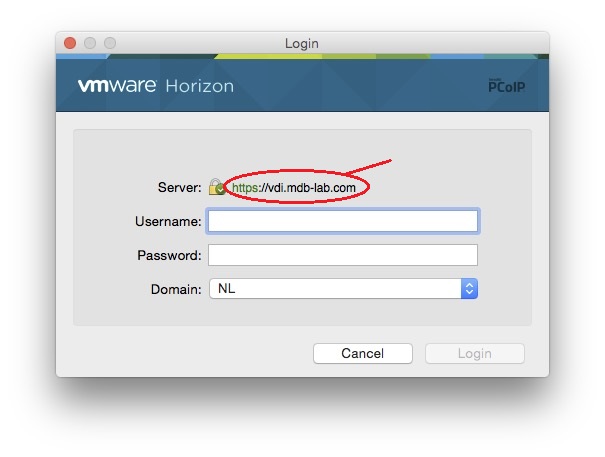 Enter your Active Directory credentials and click Login:
 Once authenticated and logged in you should see your assigned desktop pool(s) and published applications.
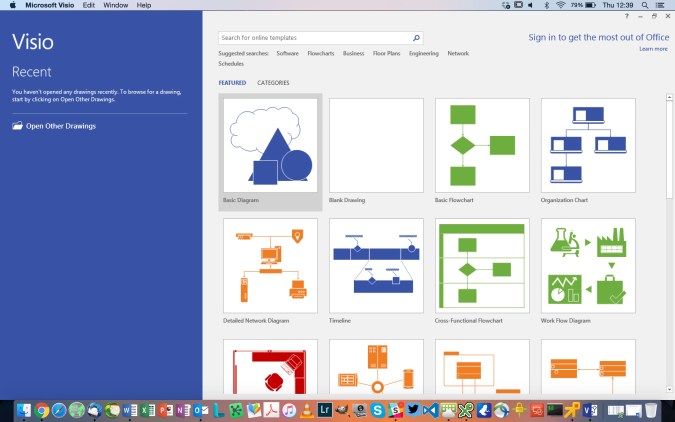
The following is Microsoft Visio 2016 running on Mac OS X Yosemite:
Conclusion
In this series we have deployed a complete virtual desktop solution using VMware Horizon View 6.2.
We have installed and configured:
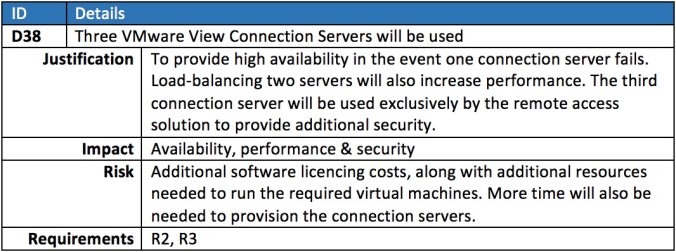
- Three View Connection Servers
- One View Composer
- Two Remote Desktop Services Hosts
- One View Access Point
Together with these we have also configured the supporting infrastructure, namely:
- VMware vCenter
- F5 load-balancers
- Microsoft Project and Visio 2016
Please keep an eye out for further posts on View, especially the design element.

Pingback: Implementing a VMware Virtual Desktop Infrastructure with Horizon View 6.2 – Part 1: Design | virtualhobbit
Pingback: Implementing a VMware Virtual Desktop Infrastructure with Horizon View 6.2 – Part 2: Installing the Connection Servers and Composer | virtualhobbit
Pingback: Implementing a VMware Virtual Desktop Infrastructure with Horizon View 6.2 – Part 3: Creating the templates | virtualhobbit
Pingback: Implementing a VMware Virtual Desktop Infrastructure with Horizon View 6.2 – Part 4: Configuring the RDS hosts | virtualhobbit
Pingback: Implementing a VMware Virtual Desktop Infrastructure with Horizon View 6.2 – Part 5: Pool configuration | virtualhobbit
Pingback: Implementing a VMware Virtual Desktop Infrastructure with Horizon View 6.2 – Part 6: Application farm configuration | virtualhobbit
Pingback: Implementing a VMware Virtual Desktop Infrastructure with Horizon View 6.2 – Part 7: Load-balancing | virtualhobbit
Thanks a lot mate for this great series.
LikeLiked by 1 person